Updating Kubernetes Cluster (K8s) for NAPP Deployment

CONTENT

This post is aimed at those who need to update the version of the Kubernetes cluster that supports the NSX Application Platform (NAPP) solution. It must always be aligned with VMware’s interoperability matrix. The process we will describe below should also be followed when performing an upgrade of NSX (which uses NAPP), vCenter (with vSphere with Tanzu), or VCF (with Workload Management enabled) to avoid breaking the integration with the Kubernetes (K8s) clusters.

What is the NAPP

NSX Application Platform (NAPP) is a microservices-based platform that houses various NSX functions that collect, ingest, and correlate network traffic information. As data is generated, captured, and analyzed in your NSX environment, NSX Application Platform provides a platform that can dynamically scale based on the needs of your environment.

The platform can host the following NSX functions that collect and analyze data in your NSX-T environment.

  • VMware NSX® Intelligence™
  • VMware NSX® Network Detection and Response™
  • VMware NSX® Malware Prevention
  • VMware NSX® Metrics

For more information, we can consult the official documentation NSX Application Platform Overview.

NAPP Deployment

For those who are unclear about what constitutes a NAPP (NSX Application Platform) deployment, we can provide an image that summarizes the deployment components. The main component supporting the NAPP solution is the vSphere with Tanzu solution.

Pasted image 20241008201848.png

I know that the previous image may cause fear. However, the engineering team at VMware By Broadcom has developed a tool called NAPPA (NSX Application Platform Automation Appliance) in order to facilitate the deployment of each of the components that make up the entire Kubernetes infrastructure required to support the NAPP (NSX Application Platform) solution.

This way, NAPPA executes flows automatically to configure vSphere with Tanzu, which is a solution that allows us to run K8s clusters directly on the hypervisor through the creation of vSphere Namespaces. Similarly, NAPPA, using the Supervisor Cluster deployed with vSphere with Tanzu, automatically creates a vSphere namespace, where a Tanzu Kubernetes Cluster is established, which we will refer to as the Guest Cluster from now on, and this is where the NSX Application Platform solution comes to life, along with all the pods associated with the services of Metric, VMware NSX® Intelligence™, VMware NSX® Network Detection and Response™, VMware NSX® Malware Prevention, and VMware NSX® Metrics.

To make the story shorter, we’ll leave it at that.

The issue: TKR version out of support

Now, the problem we are going to solve here is how to maintain this Guest Cluster after implementing it with the NAPPA. Because in many instances, depending on the version of NSX we had at the time of deploying the NAPP (NSX Application Platform), the version of that cluster may remain on an unsupported version which can cause issues as we update our vSphere and NSX environment.

For laboratory purposes, we have deployed the latest version of NAPP 4.2.0, and interestingly, the guest cluster has been implemented using the TKR version 1.23.8+vmware.3-tkg.1, which as of now is out of support. This behavior is a known issue for the NAPPA tool, and to avoid this behavior, I invite you to read the following post Deploying NAPP with supported TKR version.

Pasted image 20241008204215.png

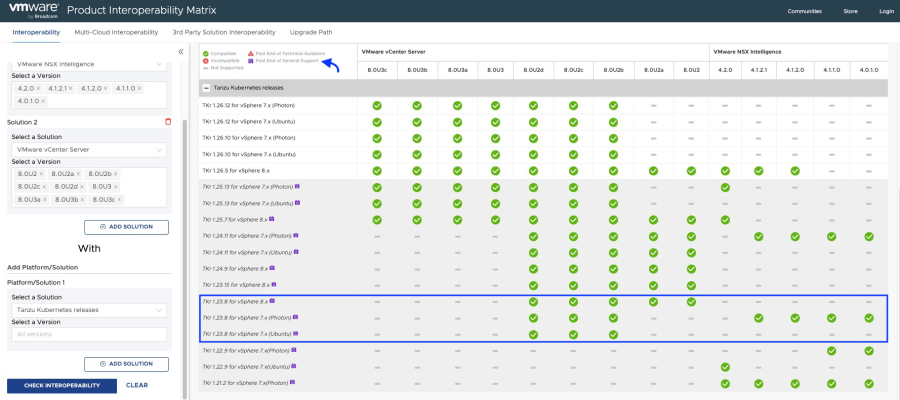
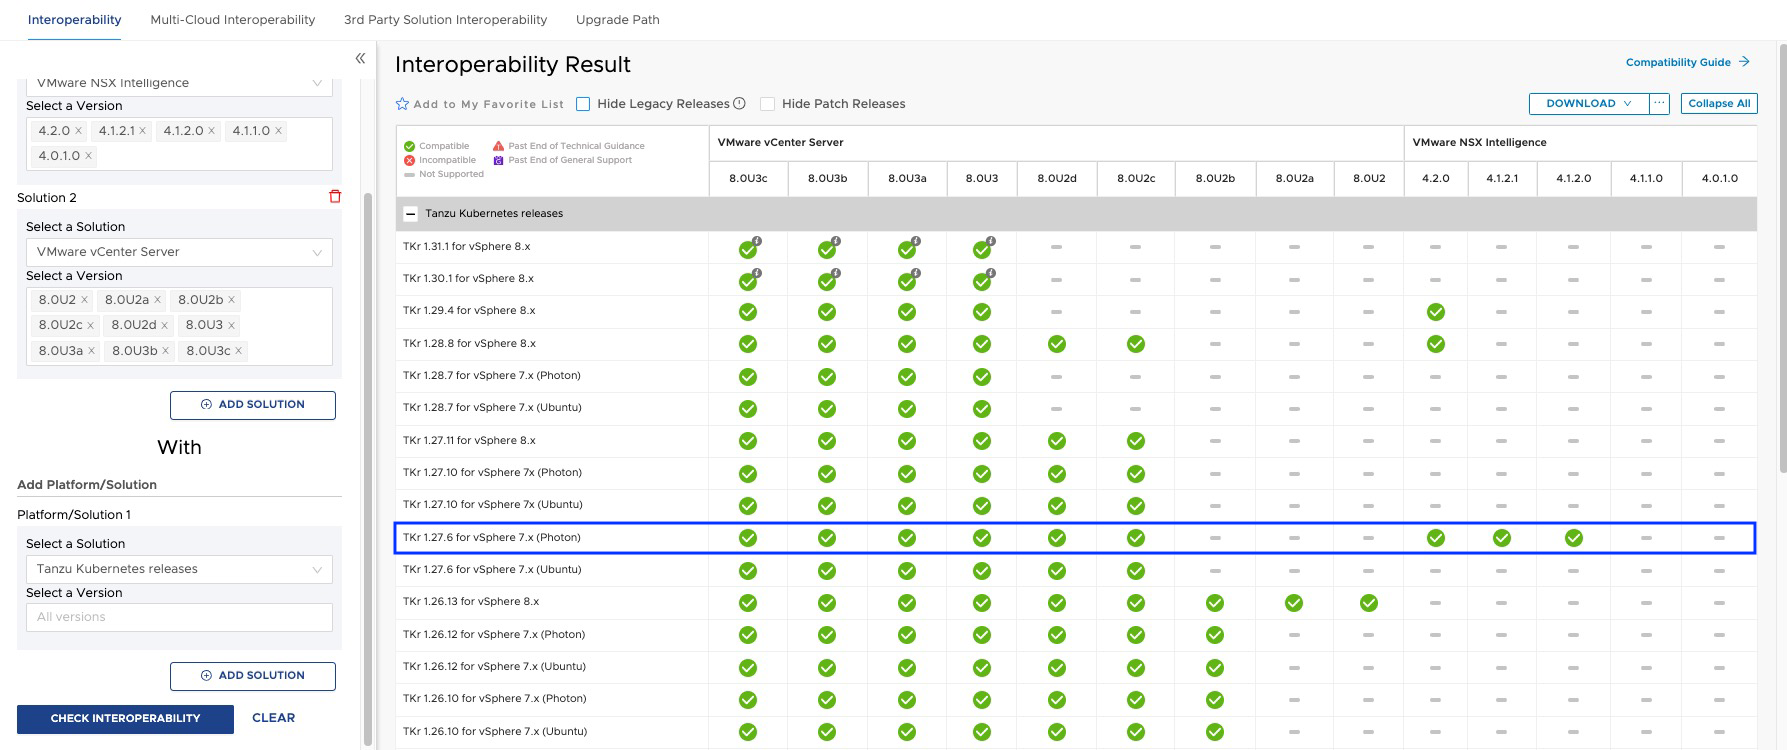
Compatibility Analysis

According to the interoperability matrix, we should meet the following minimum versions of TKR.

Pasted image 20241009201638.png
Pasted image 20241009201659.png

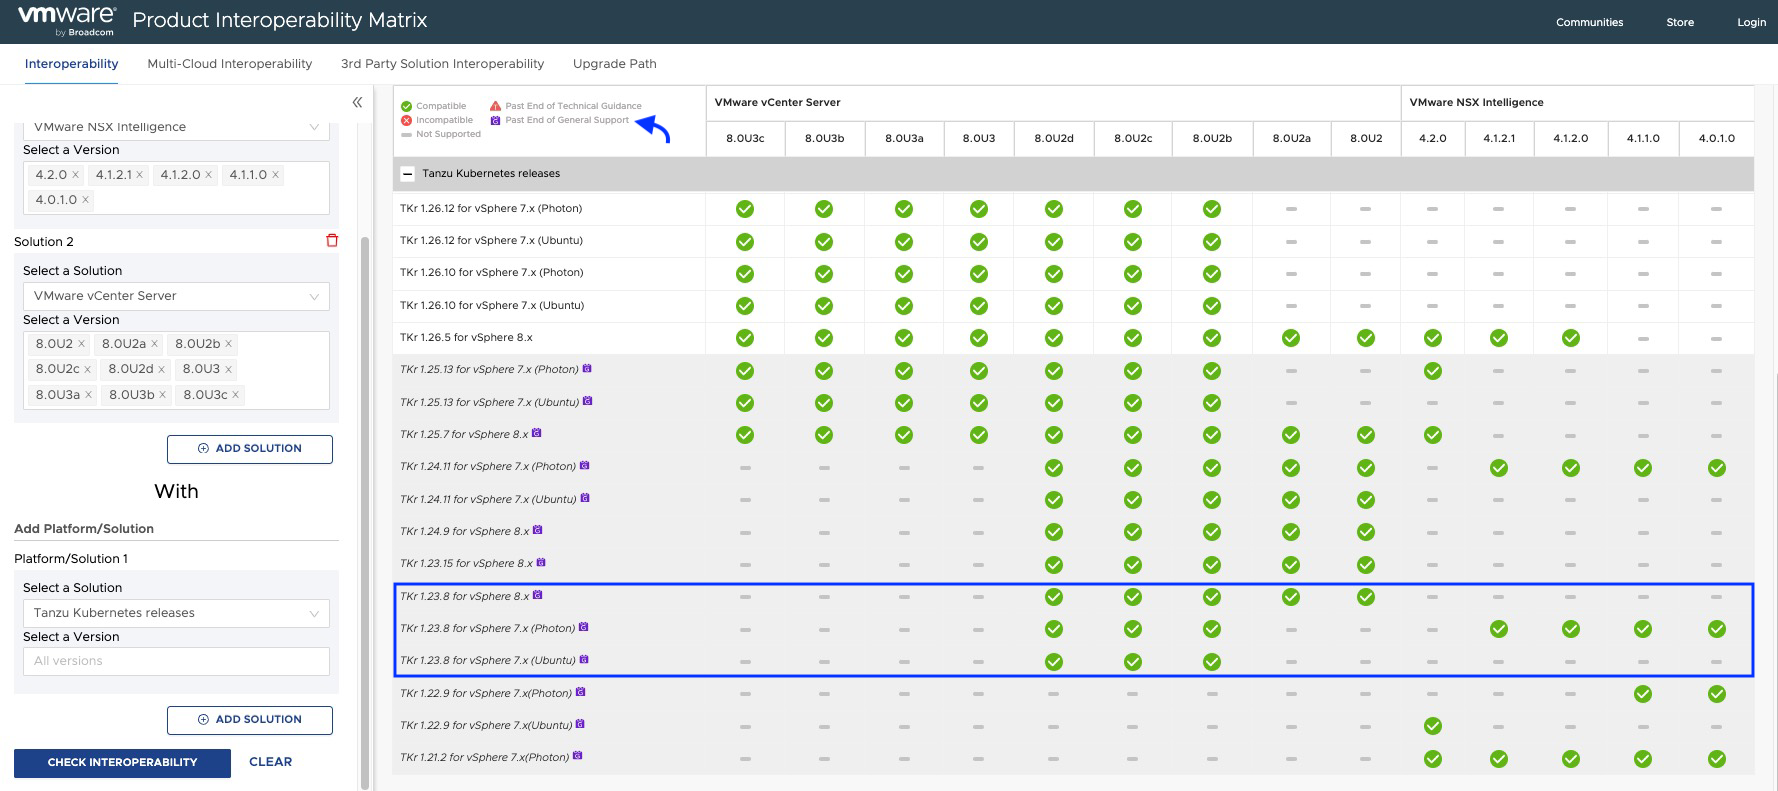
As we can see in the interoperability matrix, TKR versions below 1.26.5 used by the NAPP guest cluster are currently out of support, and some of them may not be compatible with your NSX Intelligence or your vCenter Server.

Note: The procedure explained below should be performed when we upgrade NSX or vCenter Server, whether as a result of an update of VMware Cloud Foundation (VCF) or when we update these solutions independently, in order to keep the NAPP cluster compatible and within VMware by Broadcom support.

Without further ado, let’s go to the Lab!

Solution

The first thing we will do is follow the documentation Update a TKG Cluster by Editing the TKR Version, but don’t worry, here we will explain it step by step.

Note: We must keep in mind that the TKR version can only be upgraded incrementally, n + 1, meaning that if we have version 1.23, the first jump must be to 1.24 and so on, until reaching the required version.

  1. Log in to the NAPPA via SSH, using the root user, so that we can connect to the cluster supervisor without needing to install any plugins on our VM, and we will execute the following command.
    Pasted image 20241008205643.png
  2. Run the following command to connect to the Supervisor cluster. If you don’t know the IP of the Supervisor Cluster, just go to vCenter Server > Menu > Workload Management > Namespaces > Supervisor Cluster
    Pasted image 20241008205737.png
    kubectl vsphere login --insecure-skip-tls-verify --server [IP_SupervisorCluster] --vsphere-username administrator@vsphere.local
    Pasted image 20241008210229.png 
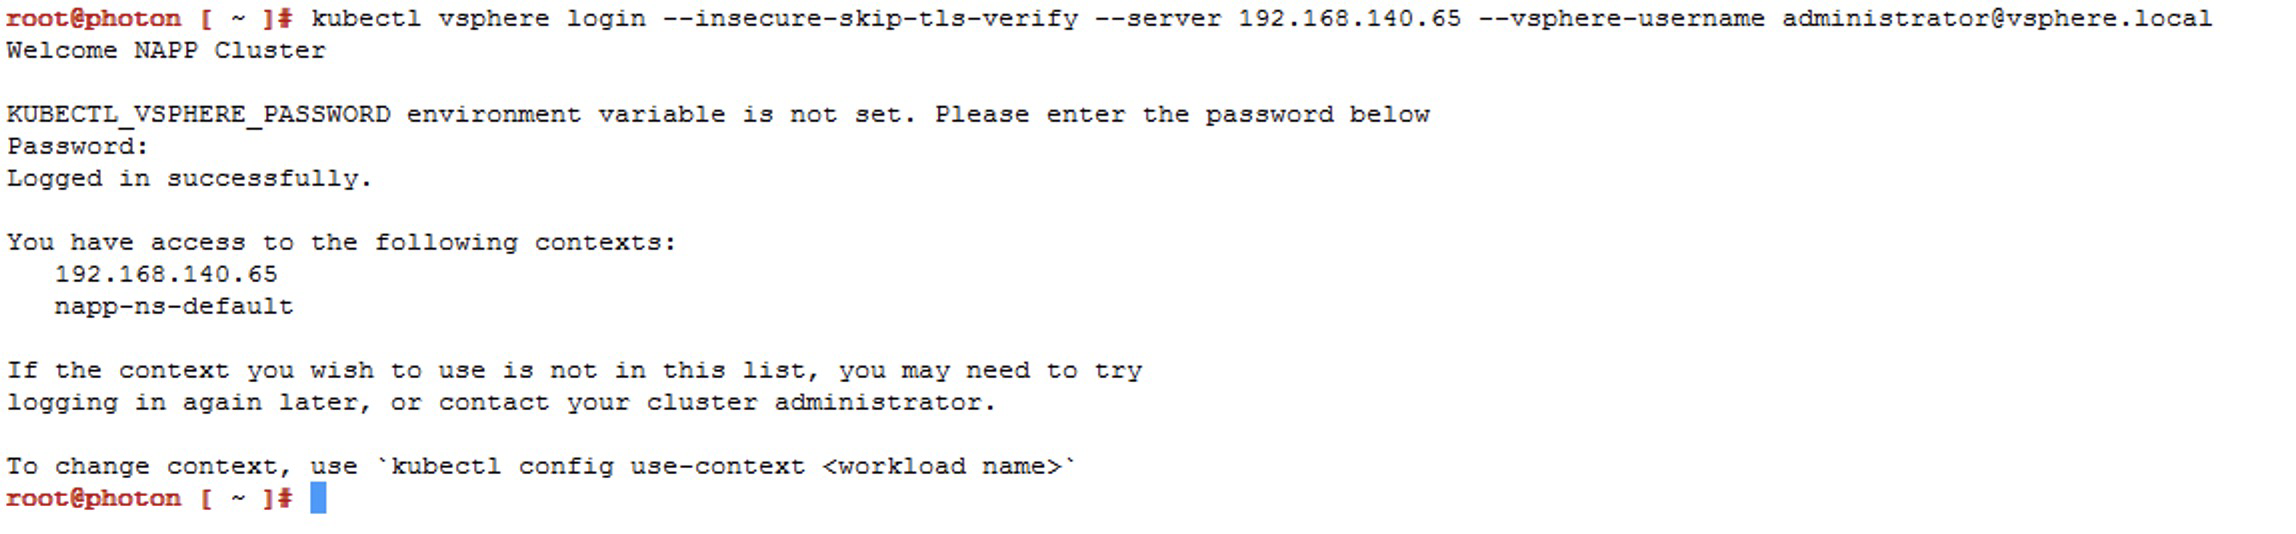
Now we will choose the context that has our napp deployment, which should be napp-ns-default, and for this we use the following command
    kubectl config use-context [context_name]
    Pasted image 20241008210416.png
  3. We will validate the compatible versions of TKR available in the content library linked to that namespace, using the following command
    kubectl get tkr
    Pasted image 20241008210538.png
    Here we can see that NAPPA has published three images in the content library, including the image 1.27.6+vmware.1-fips.1-tkg.1, which is newer and compatible. However, at the time of deployment, the 1.23.8+vmware.3-tkg.1 was used, which is unfortunate because now we have to upgrade the Guest Cluster to reach that version or a higher compatible one according to the interoperability matrix.

    Note: During deployment, NAPPA configures a content library called NSX Content Library in the vCenter, with those three images. However, we cannot jump from v1.23.x to v1.27.x as previously mentioned, so we will have to upload the images to that library.
    Pasted image 20241008210919.png

  4. To download and upload the missing images to the content library, we need to go to the following URL https://wp-content.vmware.com/v2/latest/lib.json or we could also create a new Content Library Subscribed with the following URL https://wp-content.vmware.com/v2/latest/lib.json and connect the namespace to that library.

    In this case, we will use the first option, and our first jump will be to version v1.24.x
    Pasted image 20241008211501.png
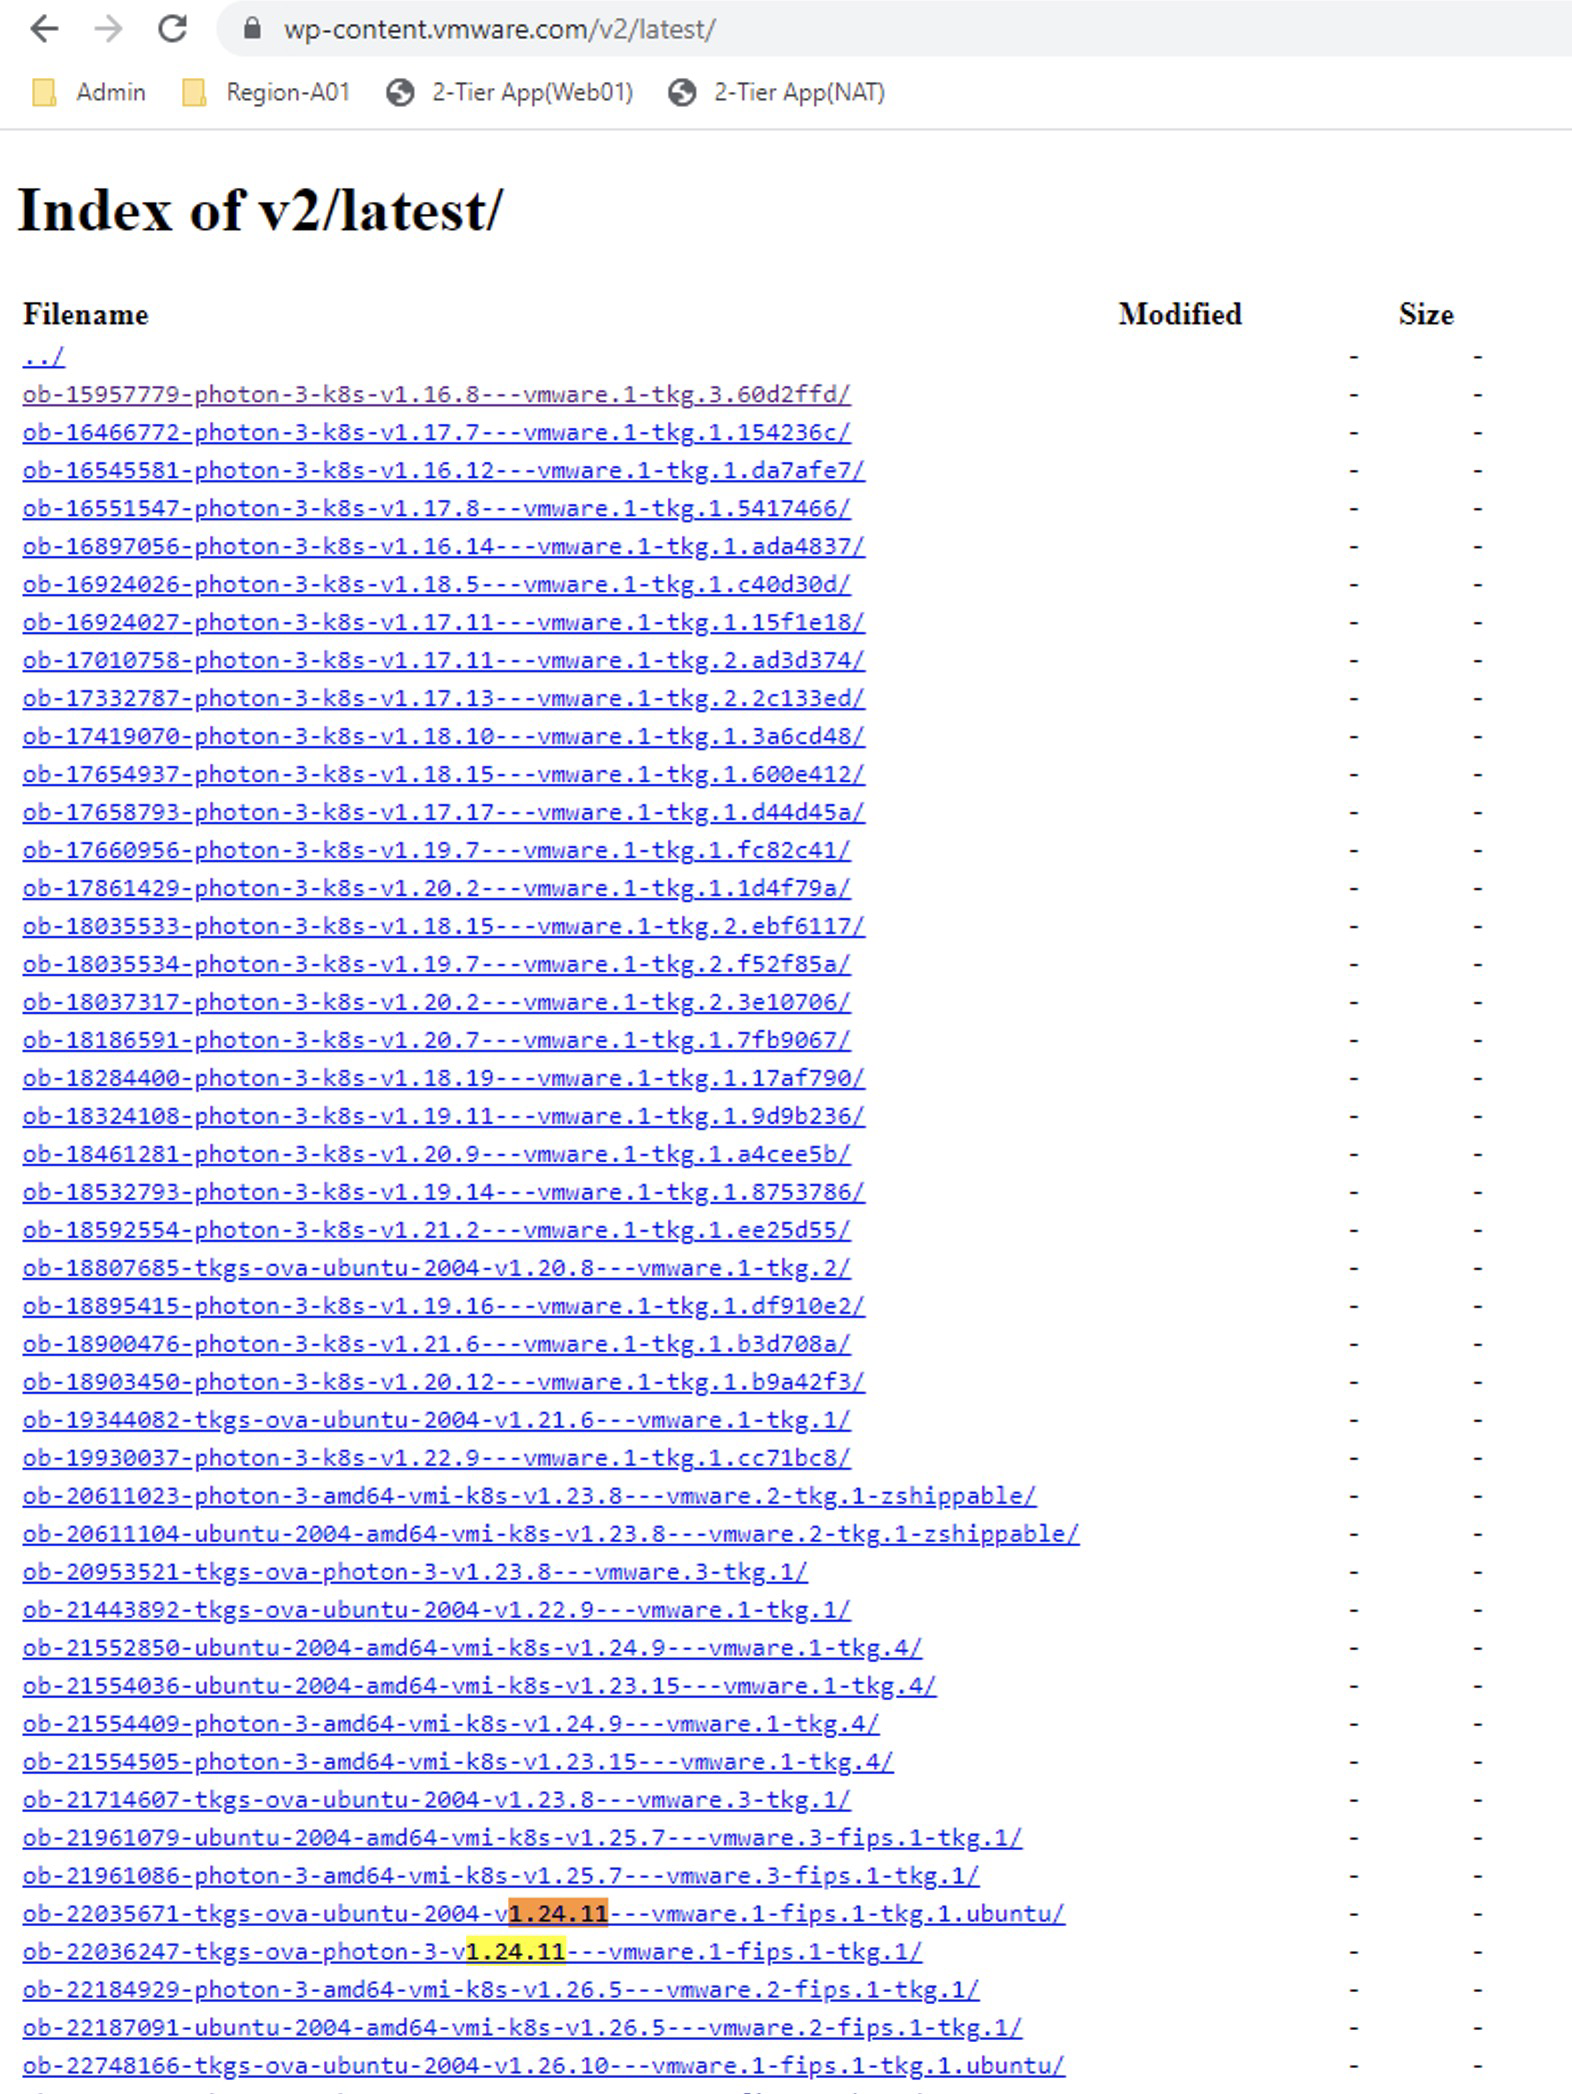
    In the repository, we see two images, but we will select the one called ob-22036247-tkgs-ova-photon-3-v1.24.11---vmware.1-fips.1-tkg.1 that is of course compatible according to the interoperability matrix. So we click on it and then right-click on photon-ova.ovf to copy the link.

    Pasted image 20241008211758.png

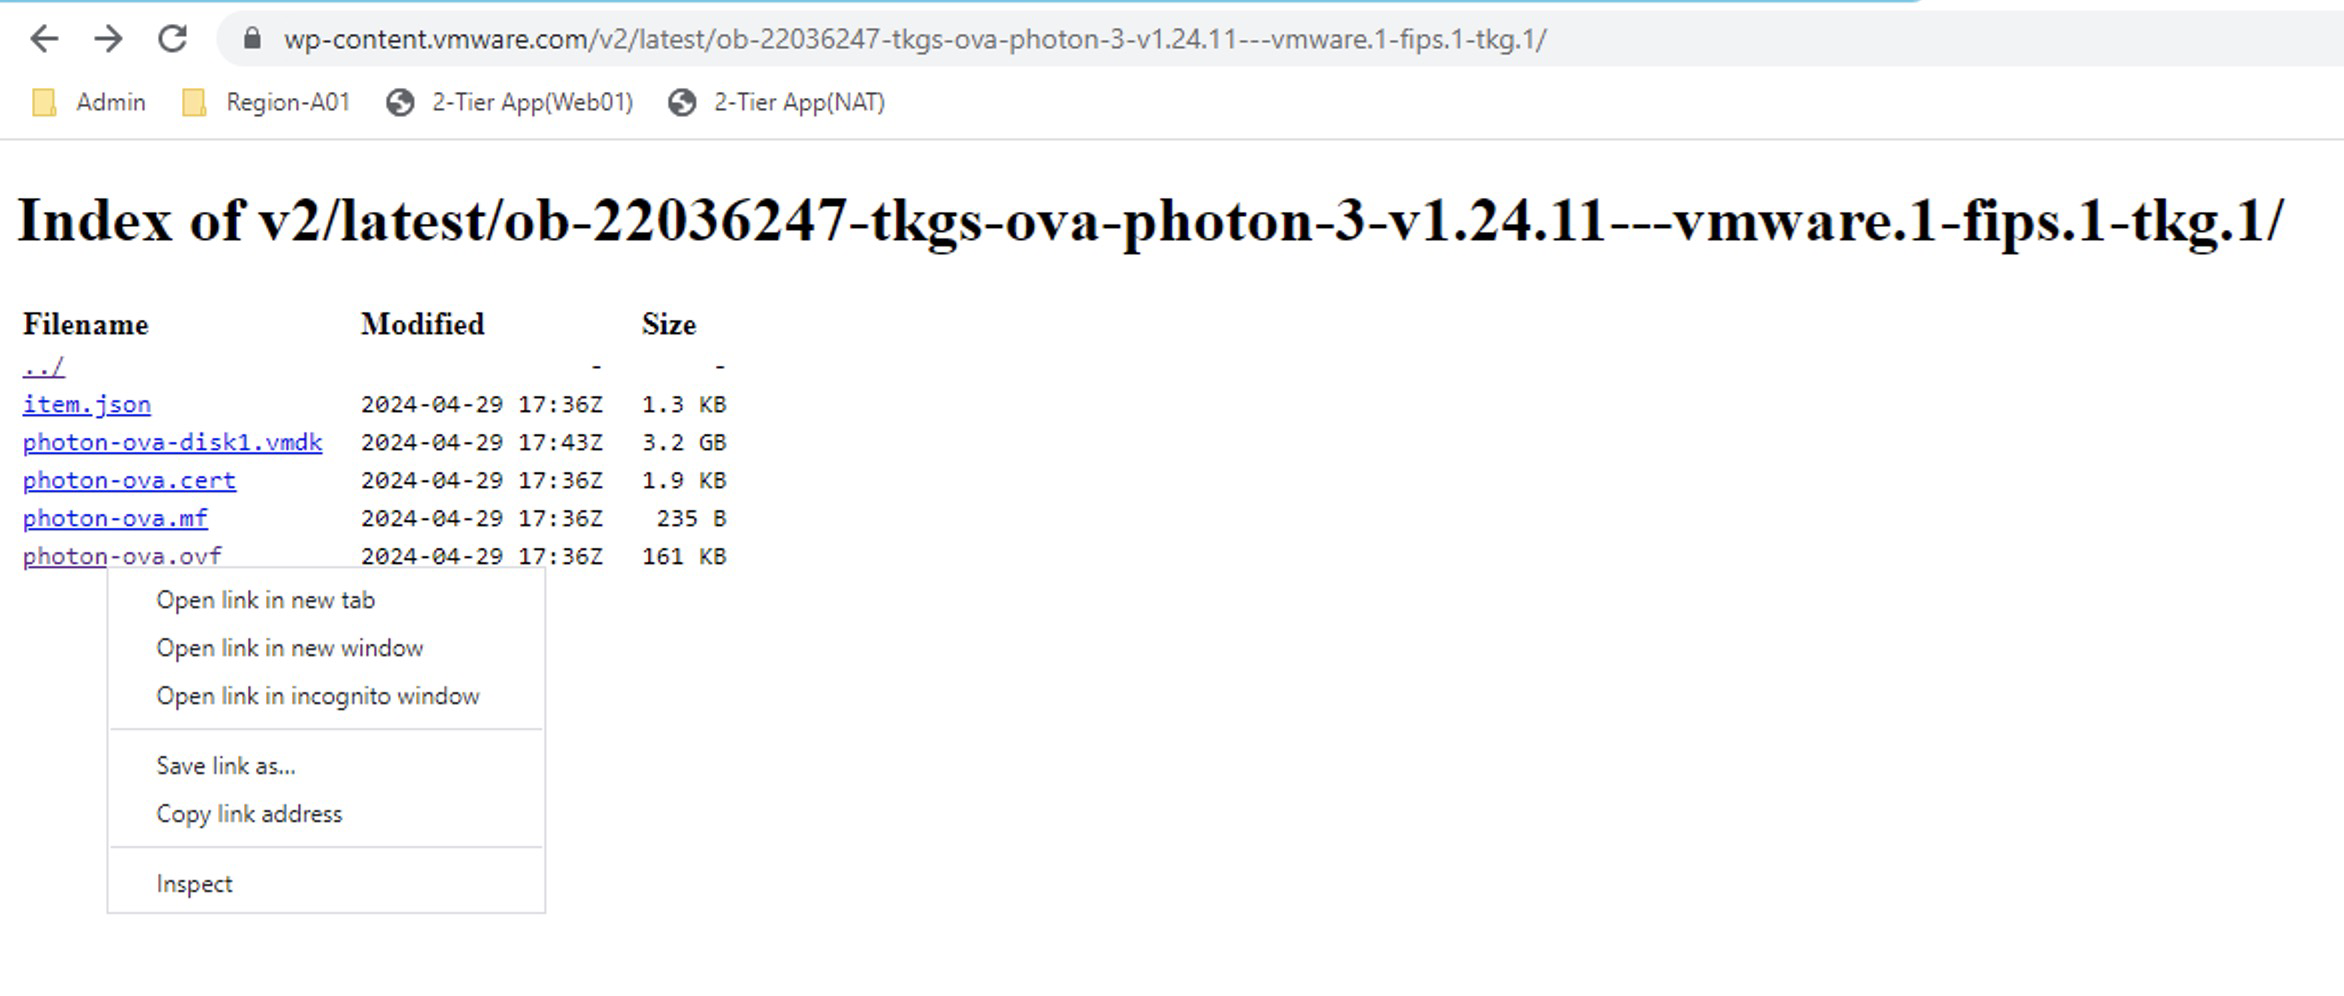
  5. Now let’s go to the content library NSX Content Library > Actions > Import Library Item and select the URL option, where we will paste the copied link earlier.

    Pasted image 20241008214718.png

    Note: In the item name, I recommend using the same name as in the download portal for easy identification.

    Click on IMPORT and wait for it to download.


    Pasted image 20241008214744.png Repeat the steps for the following images that will be the gradual jumps:
    ob-22757567-tkgs-ova-photon-3-v1.25.13---vmware.1-fips.1-tkg.1
    ob-23319040-tkgs-ova-photon-3-v1.26.12---vmware.2-fips.1-tkg.2
    ob-23049612-tkgs-ova-photon-3-v1.27.6---vmware.1-fips.1-tkg.1
    ob-24026550-tkgs-ova-photon-5-v1.28.7---vmware.1-fips.1-tkg.1

    The Content Library should look like the following. Remember that the images we have selected have been chosen considering the interoperability matrix between NSX intelligence and Tanzu Kubernetes Releases.


    Pasted image 20241008222258.png 
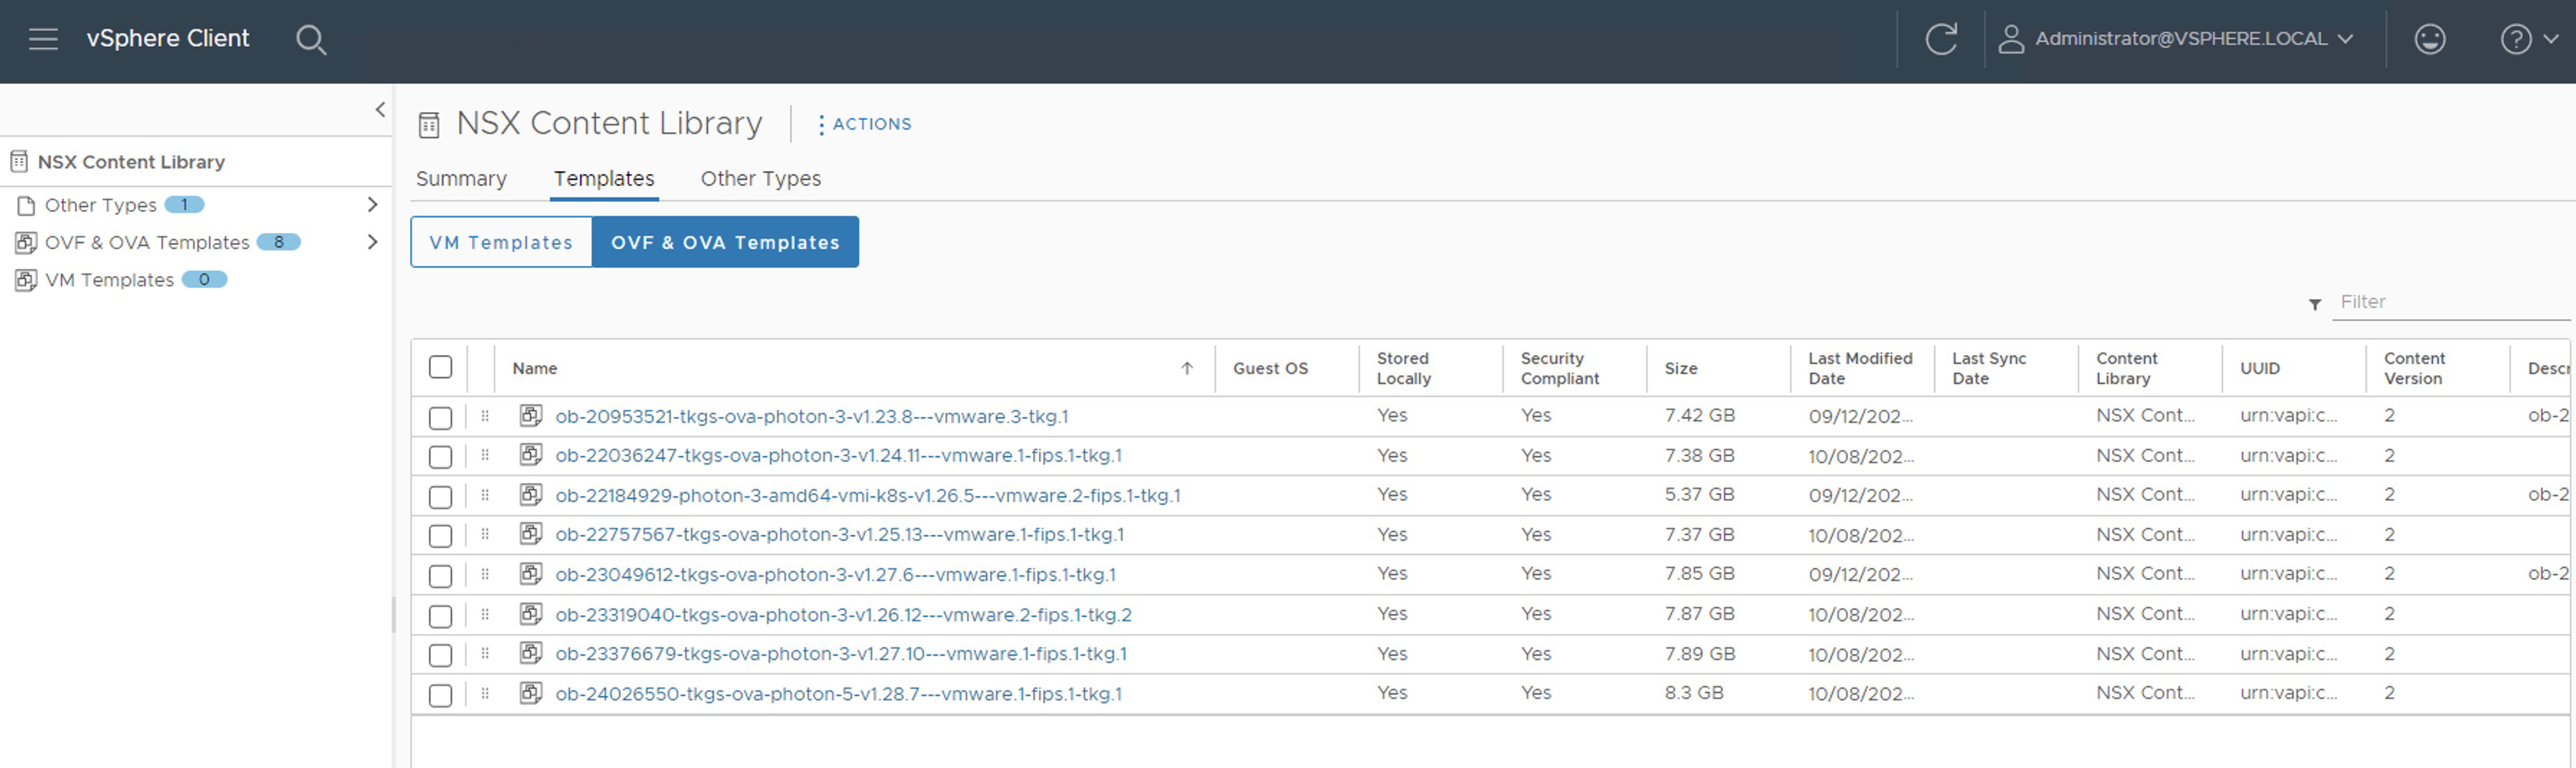
Now if we run the command kubectl get tkr again, the images we have uploaded should show true in the READY and COMPATIBLE columns.

    Note:
    We should not apply any image that does not meet these conditions.

    Pasted image 20241008222327.png

  6. Now we run the following command to see the next available version of the Kubernetes cluster and the name of the Guest Cluster that we are going to intervene.
    kubectl get tanzukubernetescluster
    Pasted image 20241008222057.png
  7. We list the Tanzu Kubernetes releases
    kubectl get tanzukubernetesreleases
    Pasted image 20241008222410.png
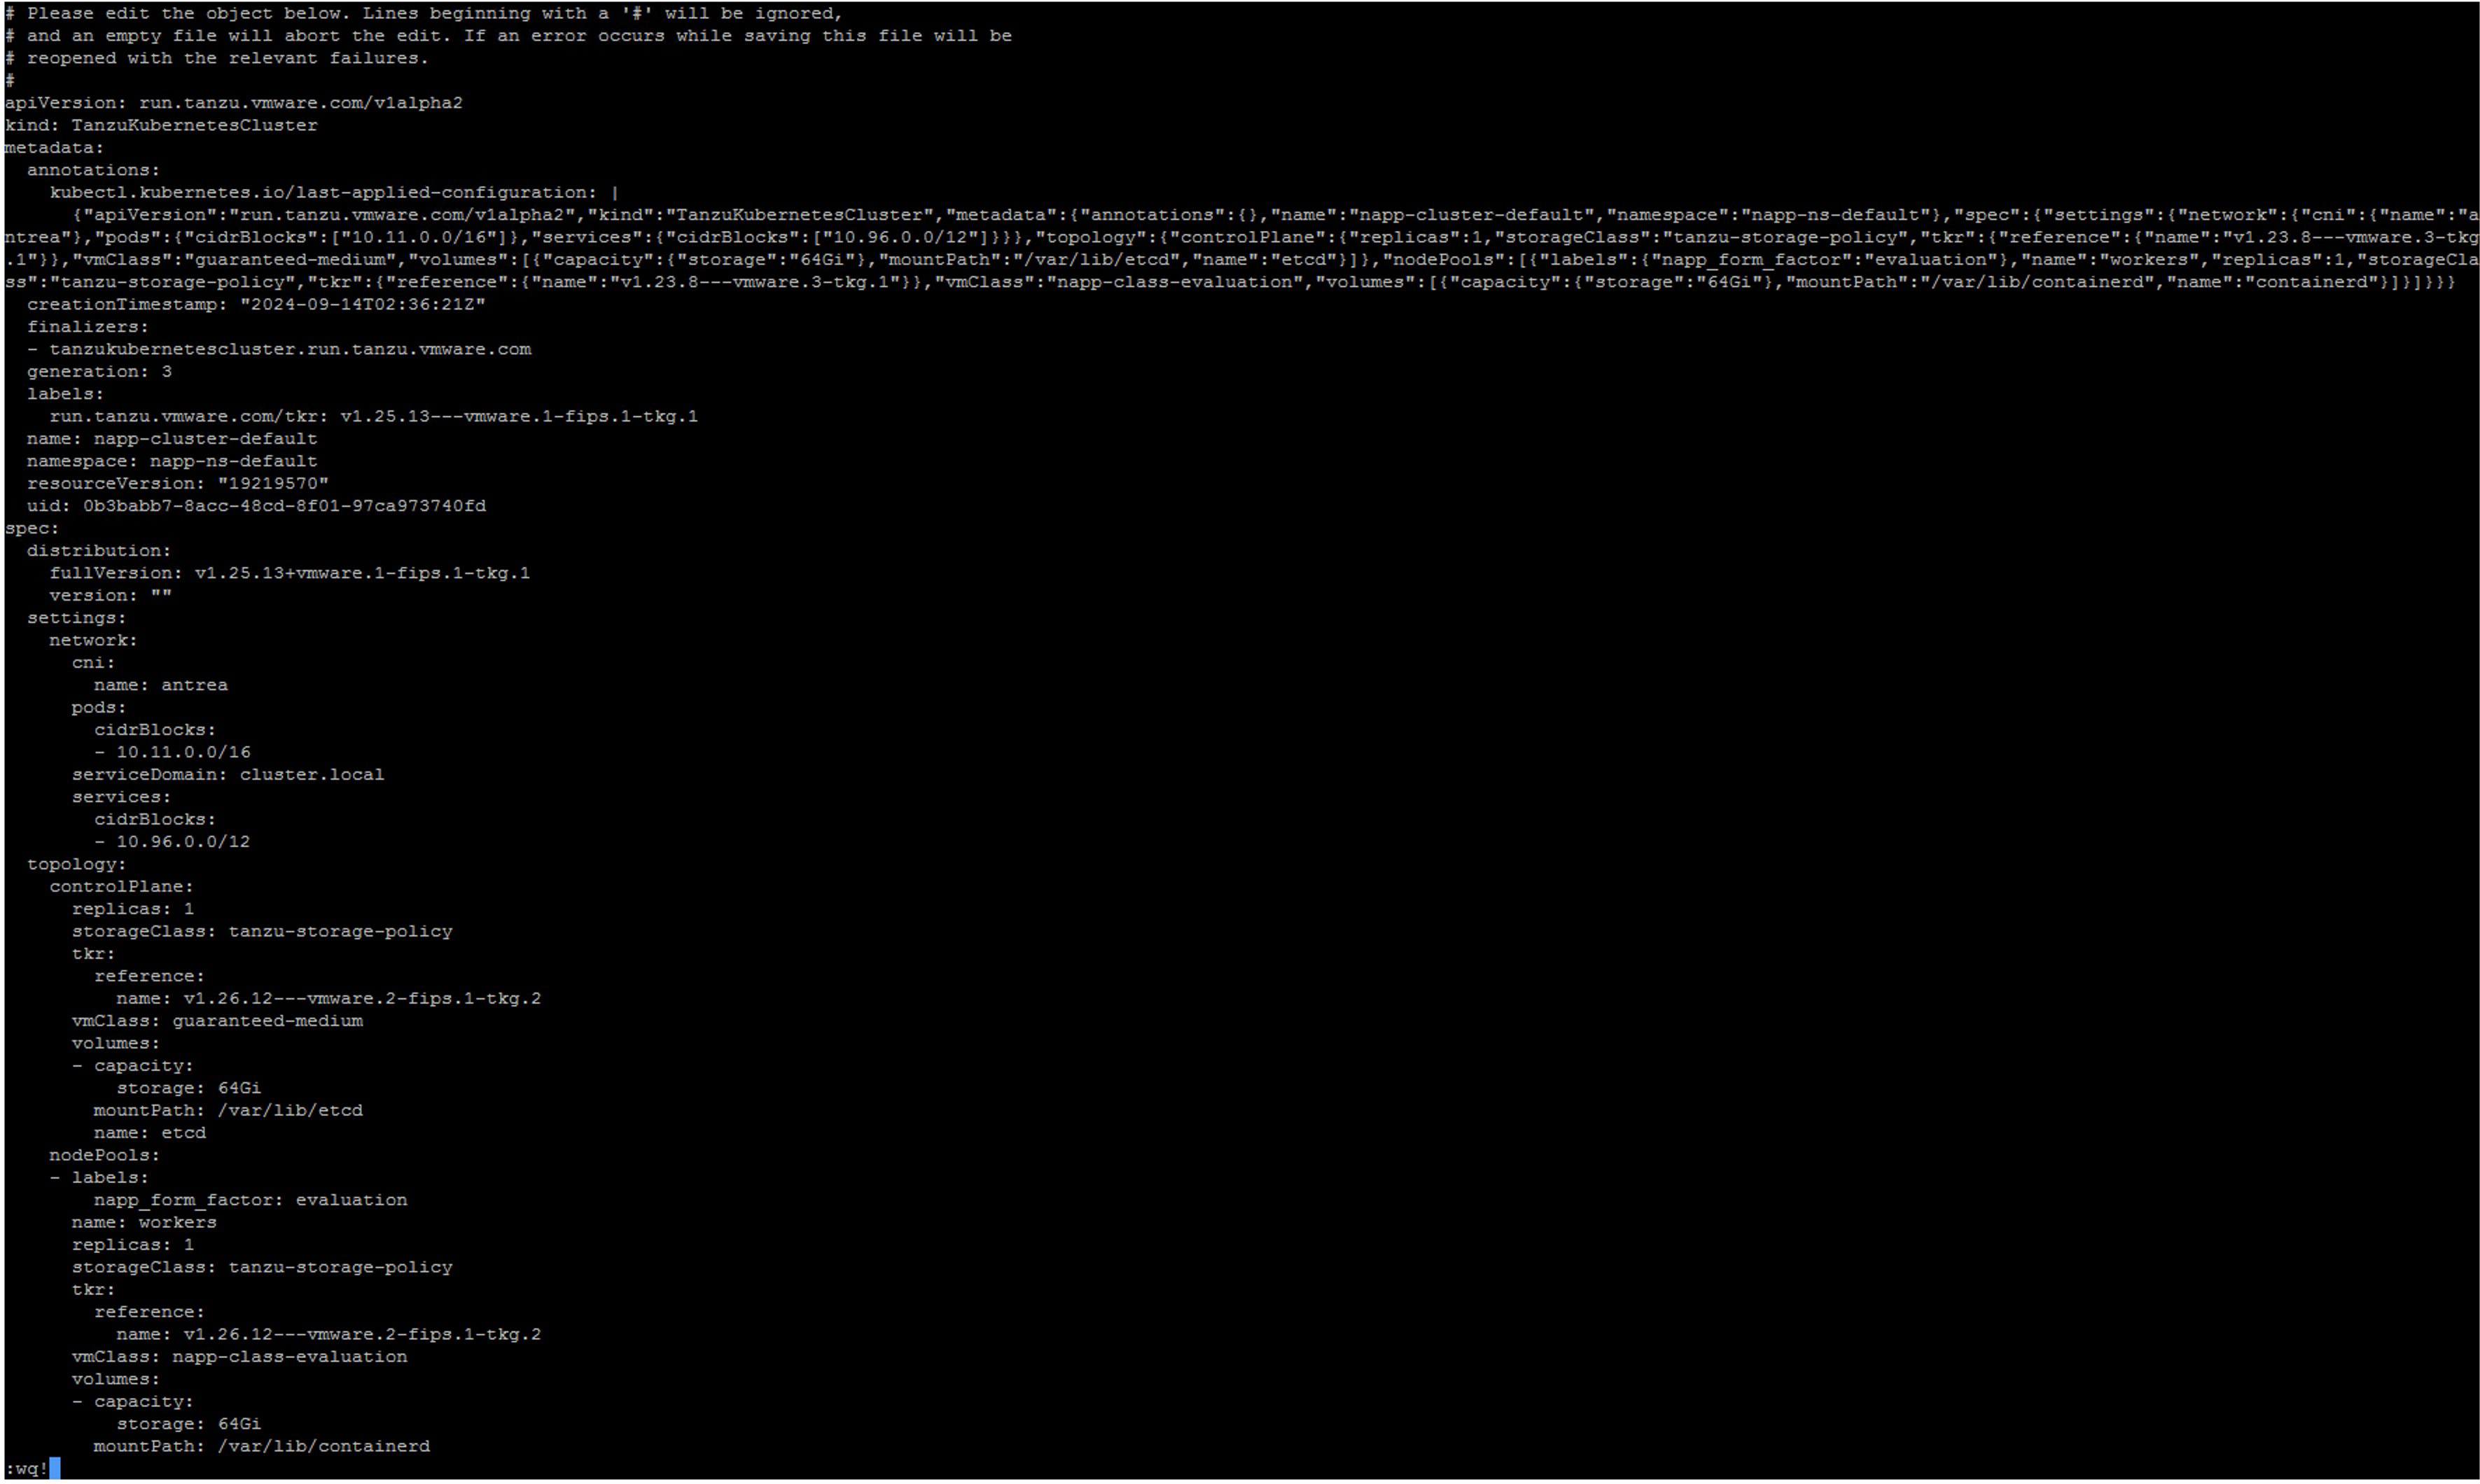
  8. We execute the following command to edit the manifest of the Guest Cluster
    kubectl edit tanzukubernetescluster/CLUSTER-NAME
    Pasted image 20241008222735.png
    Here we will edit only the lines of references for the controlplane and nodePools that appear within the topology object
    Pasted image 20241008223241.png
  9. Verify that the output of the kubectl command indicates that the manifest edit was successful
    Pasted image 20241008223302.png
  10. Verify with the following command that the Guest Cluster is updating
    kubectl get tanzukubernetescluster
    Pasted image 20241008223750.png
    Note: In the command output, we see that the READY column says False; we must wait for it to appear as True. Patience is key, this may take up to 30 minutes.
  11. Once updated, it should look as follows
    Pasted image 20241008224344.png
  12. We repeat steps 8 to 11 until we reach the target version. For example, our next jump will be to version v1.25.13---vmware.1-fips.1-tkg.1 and so on. However, before doing so, read the following important notes.
  13. At the end, we should see the distribution version as follows
    Pasted image 20241009141240.png

Important Notes

Note 1: We can monitor the process from napp-ns-default > Monitor

Pasted image 20241008224450.png

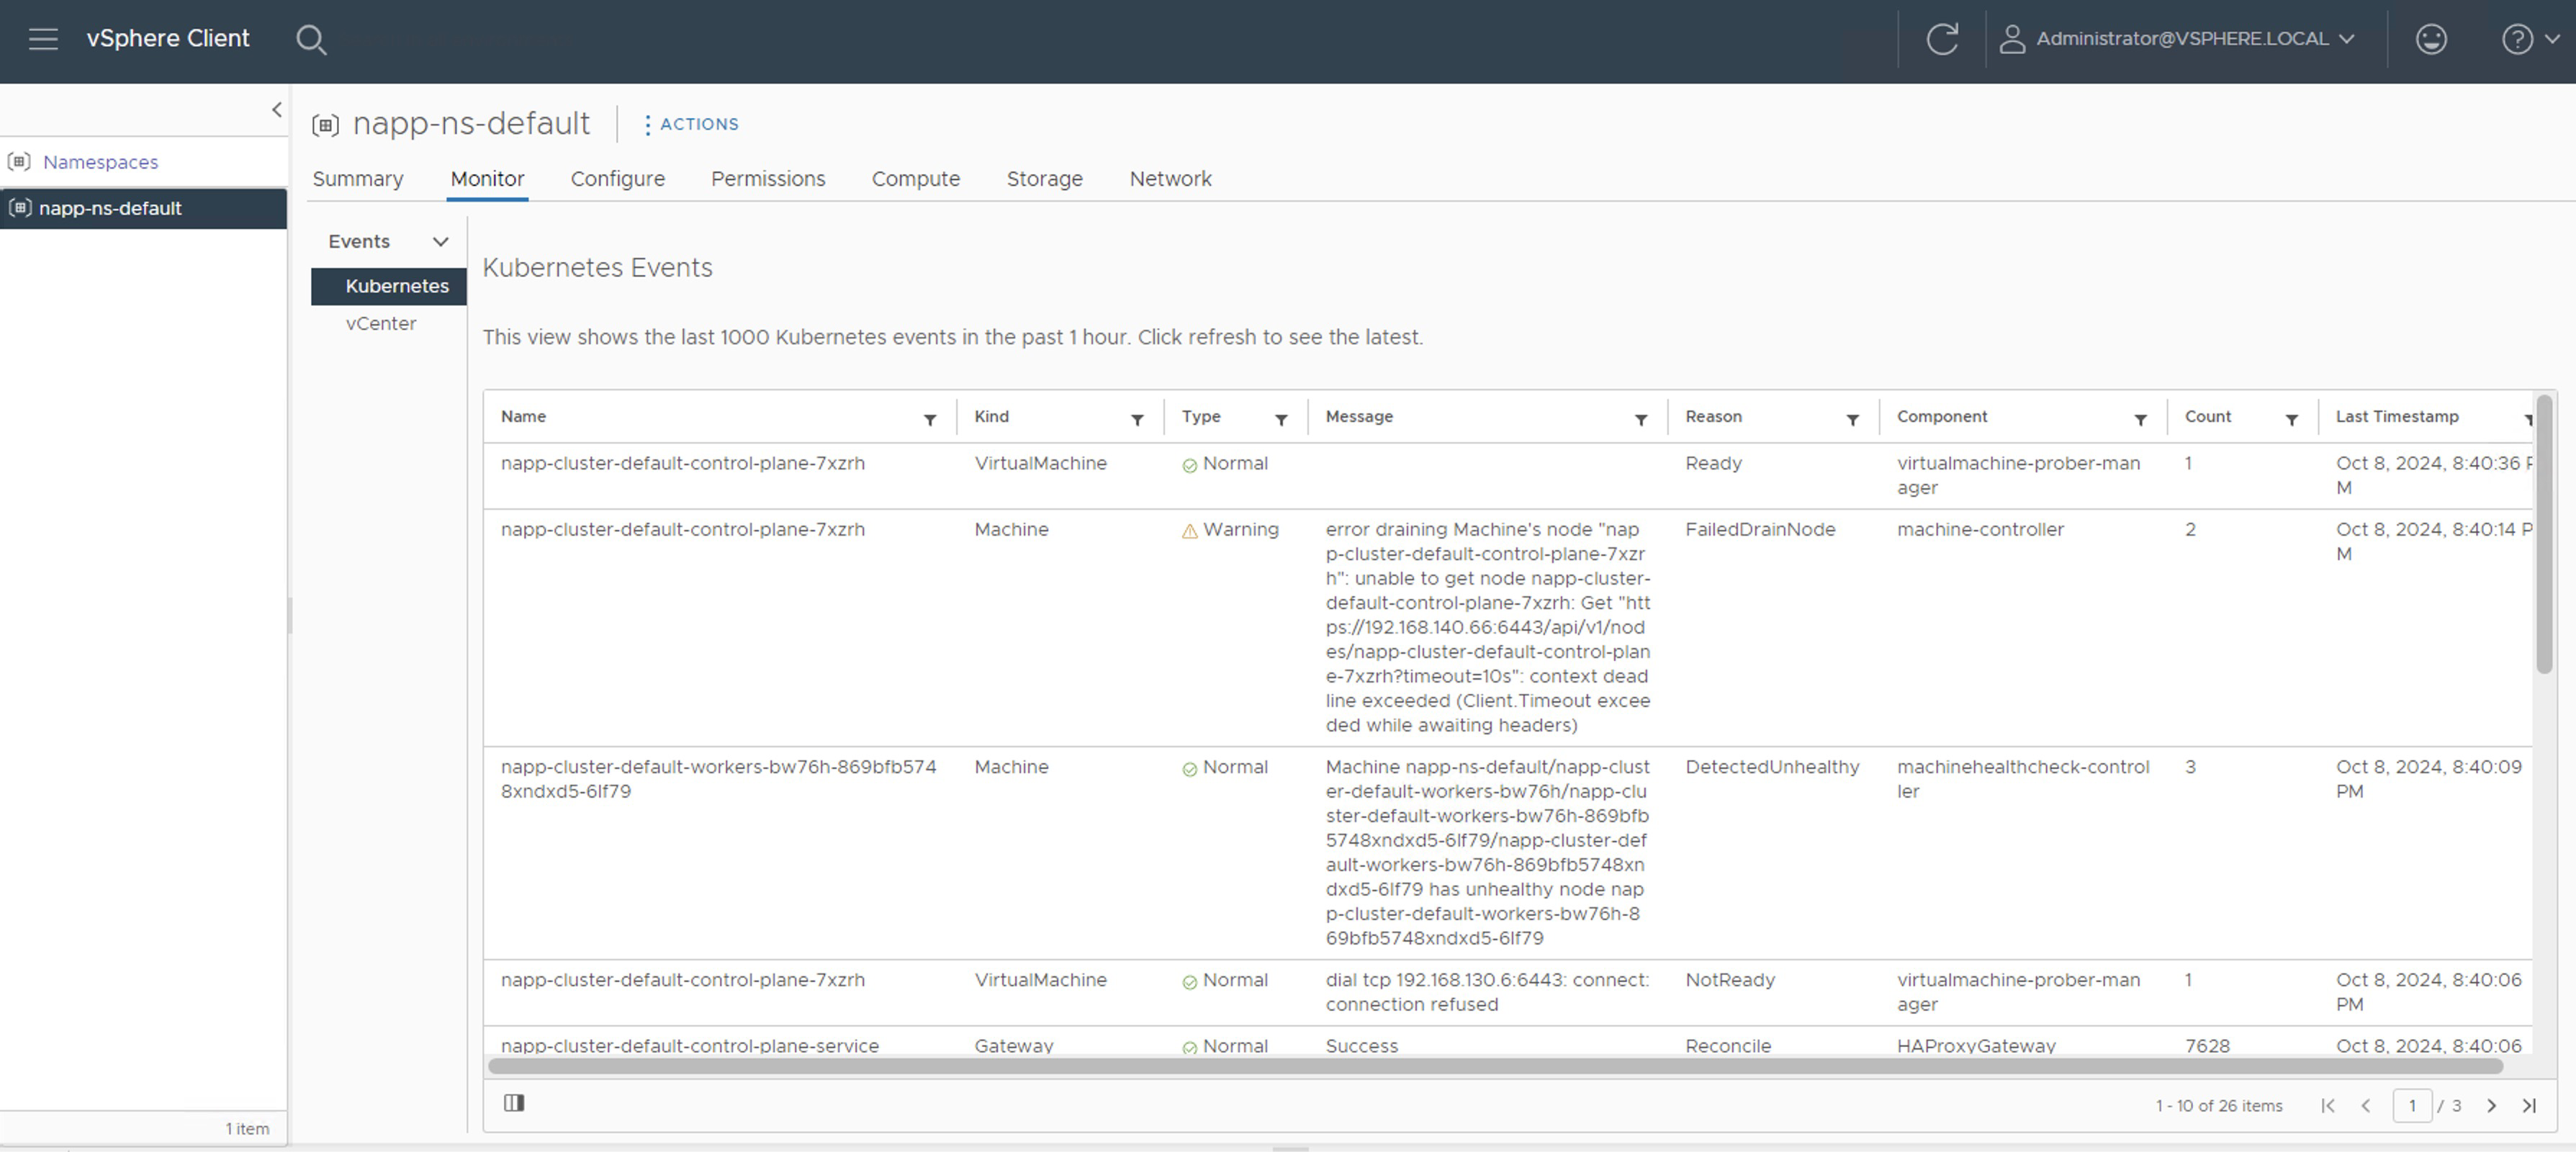
In napp-ns-default > Compute, we must wait until the Phase column changes from Updating to Running. However, when Running appears, it does not indicate that it has finished. We can still see events and tasks running in the inventory.

Pasted image 20241008225555.png

Note 2: During each upgrade jump, we will see how additional nodes are created while the process occurs. The upgrade begins with the Control Plane nodes and then with the Worker nodes. It is important that before starting the next jump, we verify that there are no running tasks, and that the number of nodes in the inventory is correct; in my case, the LAB should only have one Control Plane node and one Worker Node. In the following screenshot, we see one additional node, indicating that it has not yet finished.

Pasted image 20241008234330.png

Once all activities are completed, we will check that the number of nodes for the Guest Cluster in the inventory is correct. However, we still need to wait for the NAPP solution to stabilize.

Pasted image 20241009103042.png

Note 3: We should expect the NSX Application Platform solution to appear stable from the NSX console. This may take a few minutes.

Pasted image 20241009111506.png
Pasted image 20241009111527.png

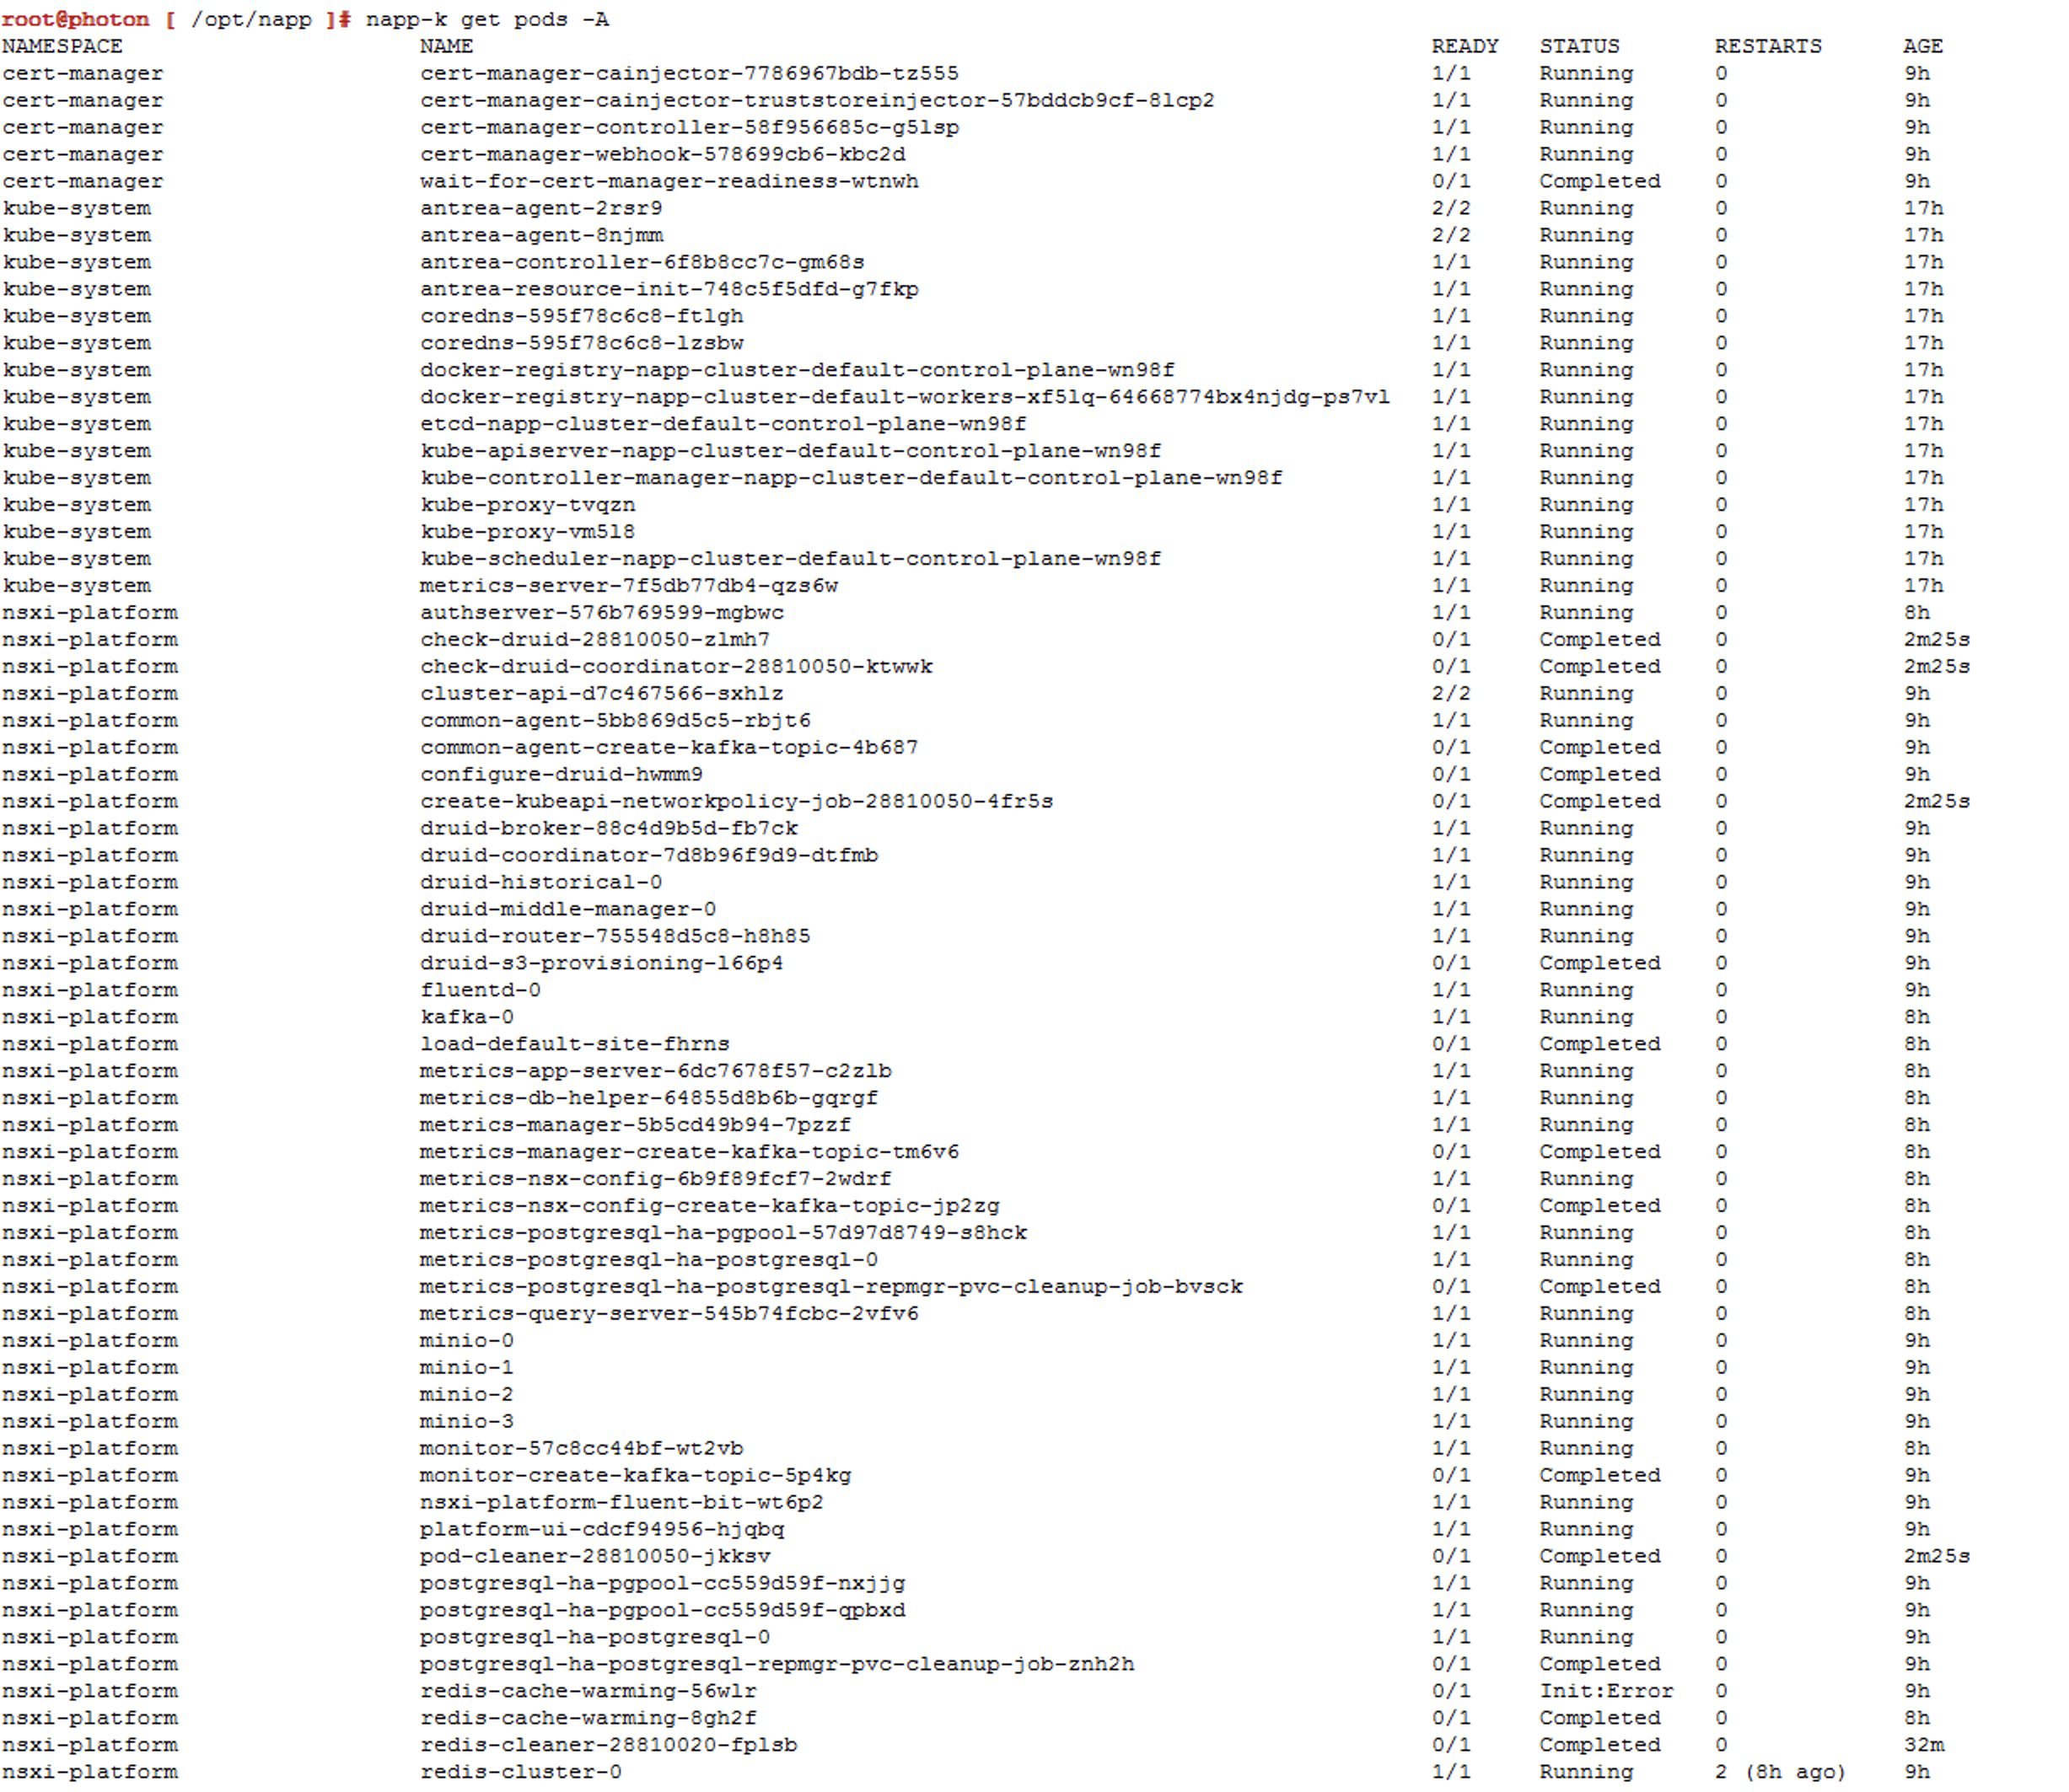
Note 4: If we use the Troubleshooting option of the NAPPA (NSX Application Platform Automation Appliance), we can see the moment when all the Pods are up.

Pasted image 20241009111711.png
Pasted image 20241009111916.png

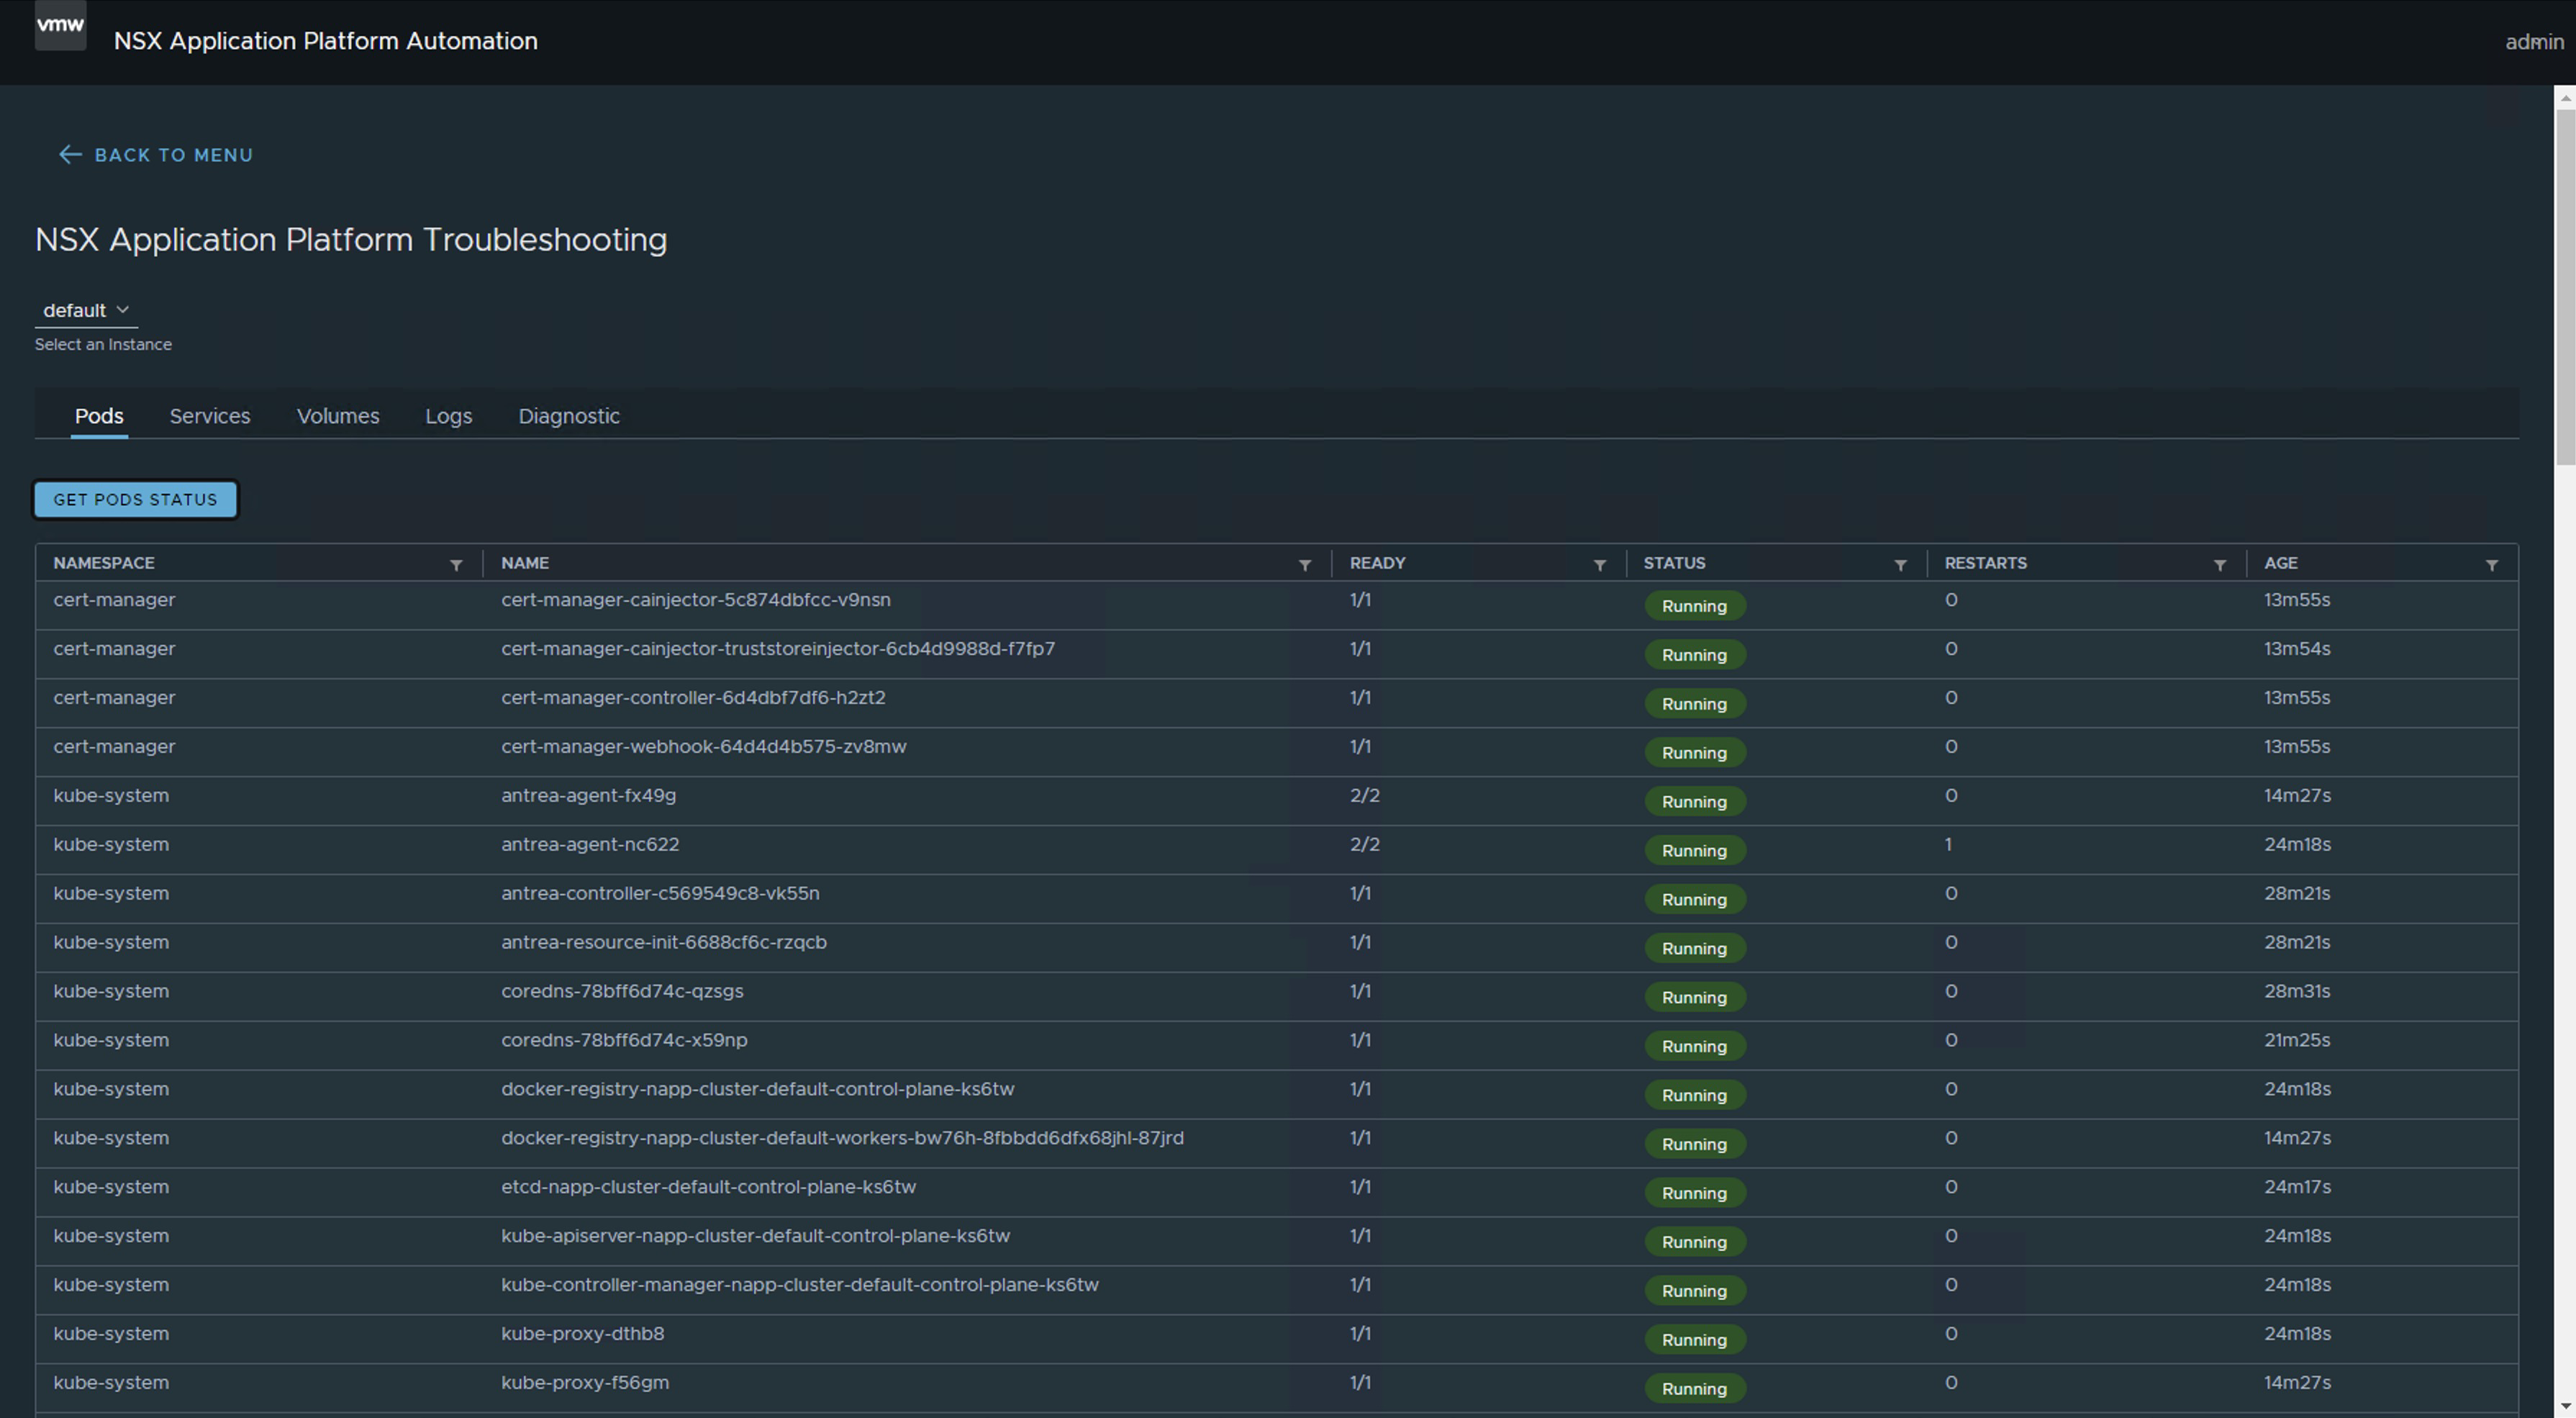
We can use the command napp-k get pods -A.

Pasted image 20241010183303.png

Reference screenshots for additional updates (jumps).

Jump to v1.25.13---vmware.1-fips.1-tkg.1

Pasted image 20241008230058.png
Pasted image 20241008230130.png
Pasted image 20241008232632.png

Jump to `v1.26.12—vmware.2-fips.1-tkg.2

Pasted image 20241008232740.png
Pasted image 20241008234210.png
Pasted image 20241009105148.png

Jump to `v1.27.10—vmware.1-fips.1-tkg.1

Pasted image 20241009105012.png

Update Kubernetes Tools

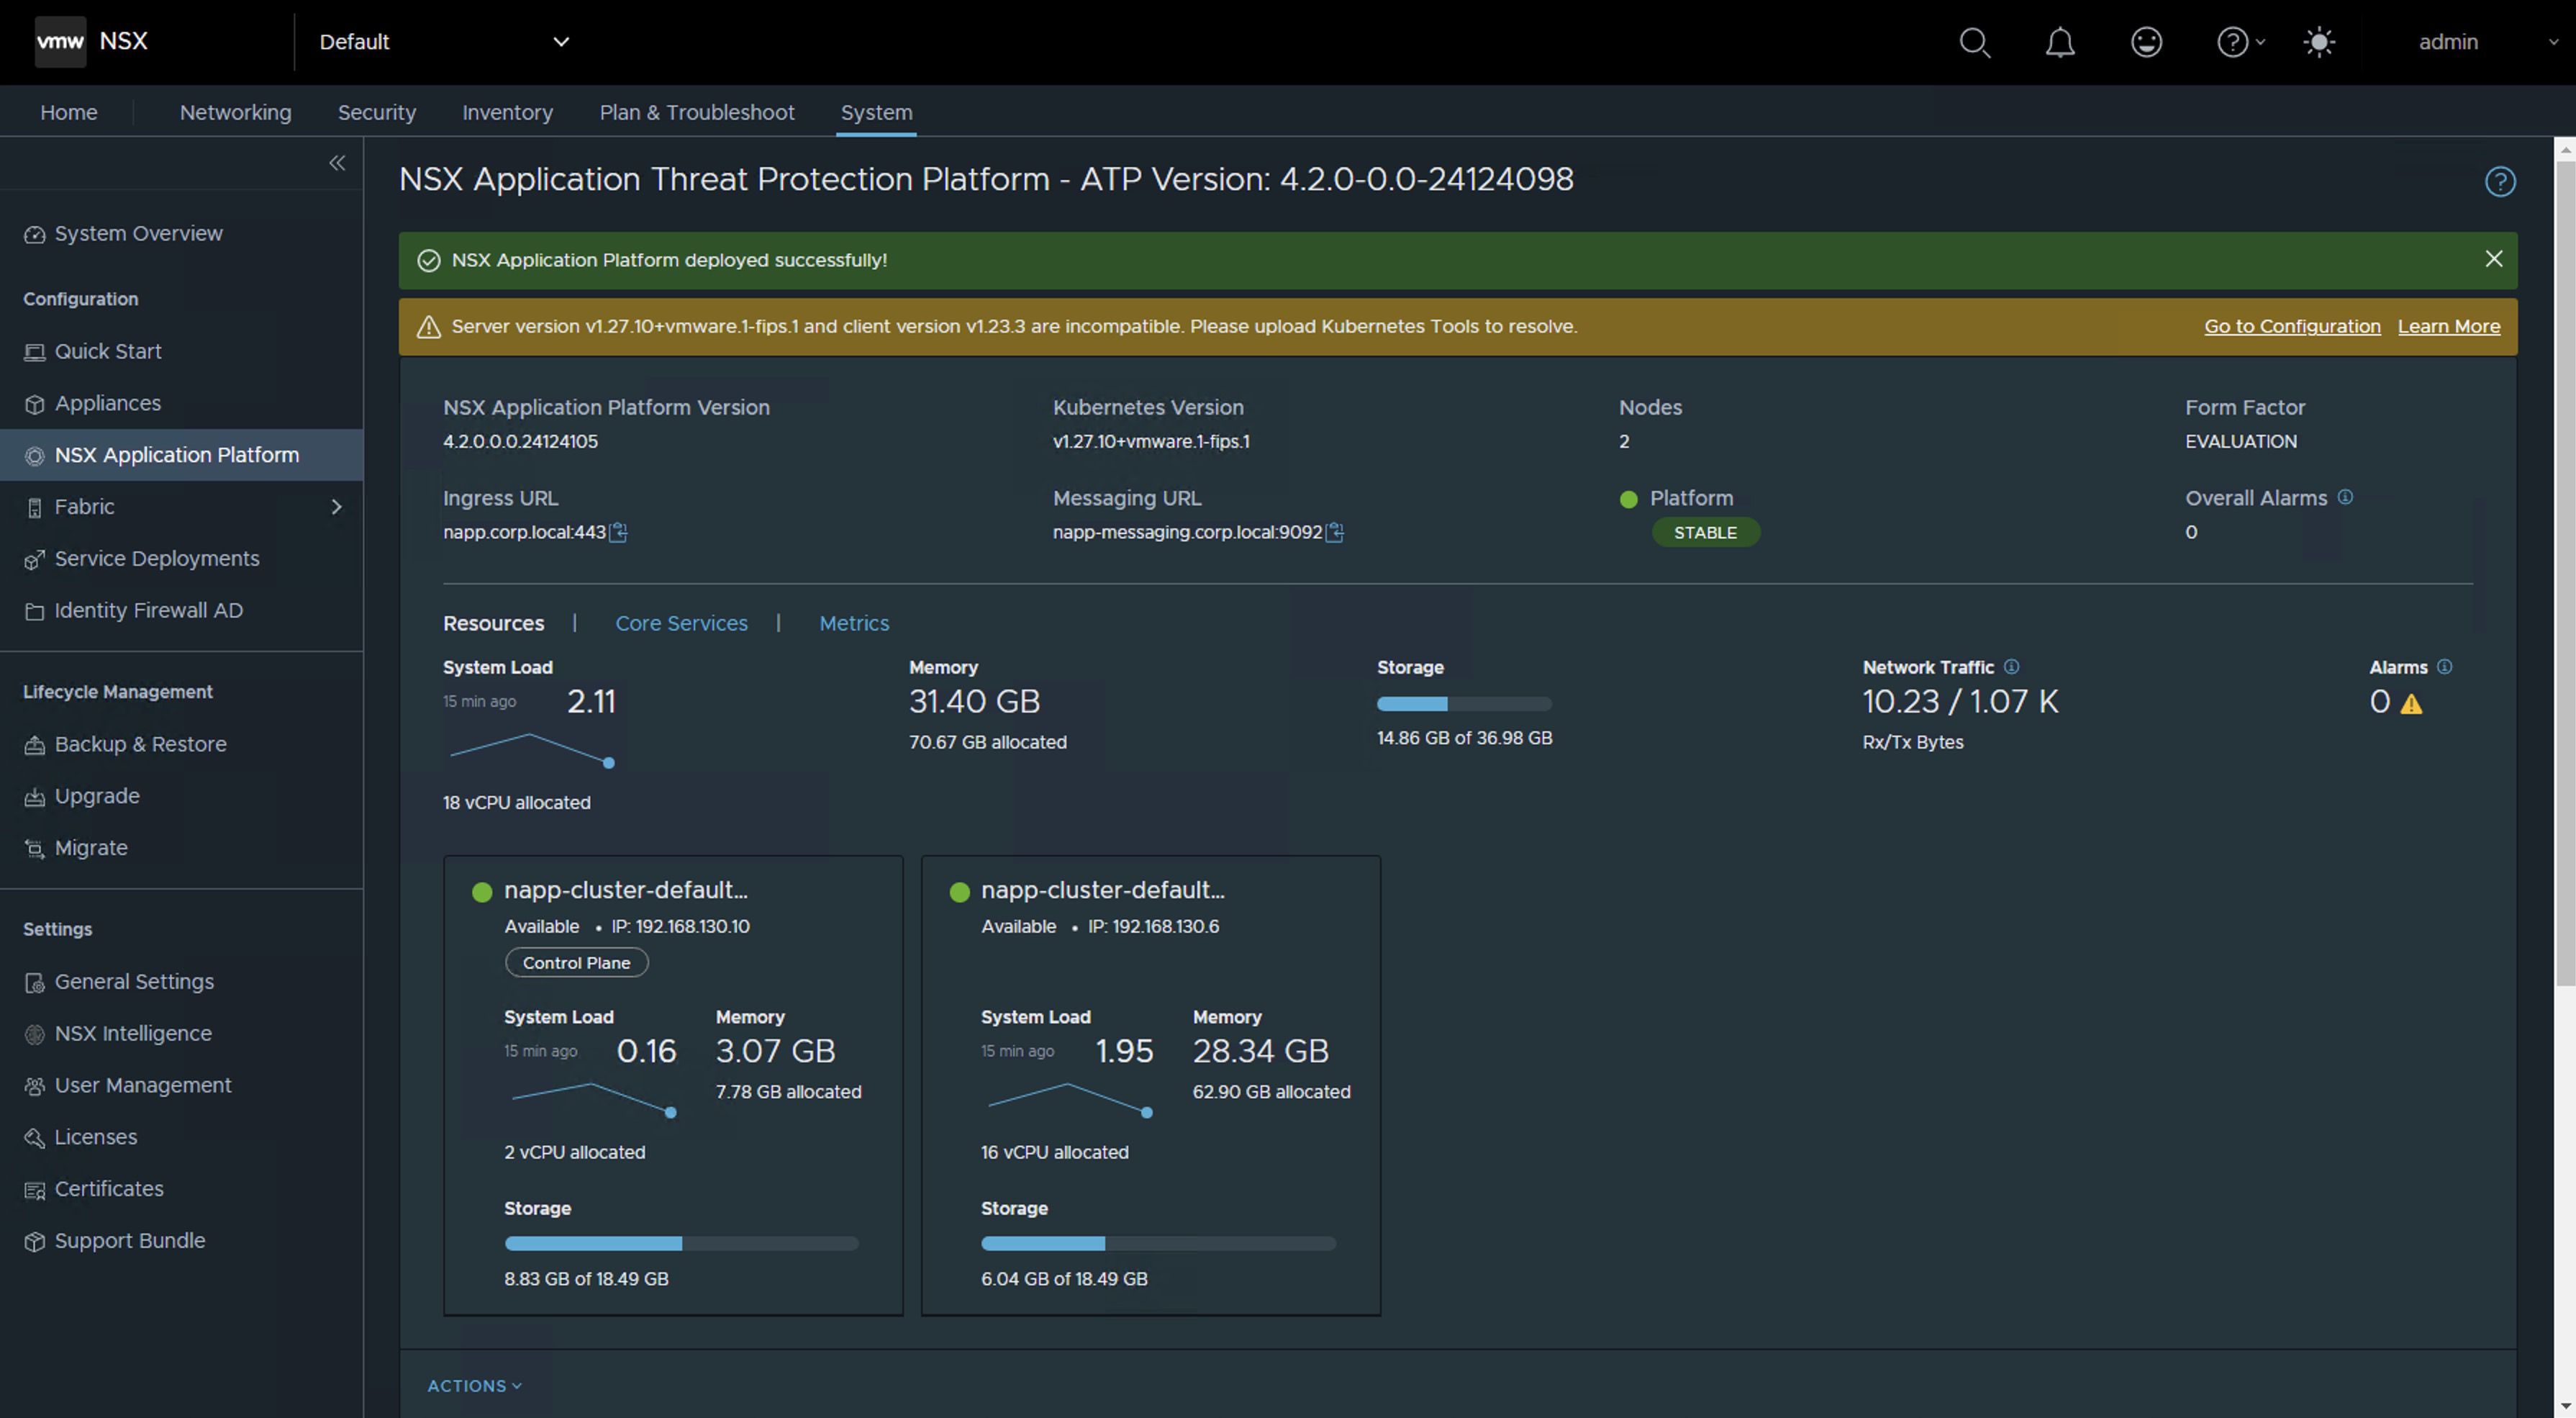
Once we have completed the updates and are now on a compatible version according to the NSX Intelligence interoperability matrix, you are likely to see the following alert on the interface. If you are on a version higher than NSX 4.1.2.2, this alert will probably not appear.

Server version v1.27.10+vmware.1-fips.1 and client version v1.23.3 are incompatible. Please upload Kubernetes Tools to resolve.

Pasted image 20241009112714.png

To resolve this alert, simply follow the next KB NAPP pane in NSX UI shows message "Server version and client version are incompatible. Please upload Kubernetes Tools to resolve.

And that’s all, folks! With this procedure, you will be able to maintain the Kubernetes (K8s) cluster deployed as part of the NSX Application Platform (NAPP) solution.

IMPORTANT! I have migrated the blog from the domain nachoaprendevirtualizacion.com to nachoaprendeit.com. If you found this article useful, please give it a like and share it with your colleagues. These actions will help me optimize search engines to reach more people.

ALL NAMES OF VMS USED IN THIS BLOG ARE INVENTED AND PERTAIN TO A PERSONAL LABORATORY ENVIRONMENT, USED FOR STUDY PURPOSES.

Guía para actualizar el cluster de Kubernetes (K8s) del NAPP

CONTENIDO

Este post está dirigido para quienes tienen la necesidad de actualizar la versión del clúster de Kubernetes que soporta la solución NSX Application Platform (NAPP). La cual debe estar siempre alineada con la matriz de interoperabilidad de VMware. El proceso que vamos a describir a continuación también debe ser realizado cuando vayamos a realizar una actualización de NSX (que utilice NAPP), vCenter (con vSphere with Tanzu) o VCF (con Workload Management habilitado) para evitar romper la integración con los clústeres de Kubernetes (K8s).

Que es el NAPP

NSX Application Platform (NAPP) es una plataforma basa en microservicios que aloja varias funciones de NSX que recopilan, incorporan y correlacionan información de tráfico de red. A medida que se generan, capturan y analizan los datos en su entorno NSX, NSX Application Platform proporciona una plataforma que puede escalar dinámicamente en función de las necesidades de su entorno.

La plataforma puede alojar las siguientes funciones de NSX que recopilan y analizan los datos en su entorno NSX-T.

  • VMware NSX® Intelligence™
  • VMware NSX® Network Detection and Response™
  • VMware NSX® Malware Prevention
  • VMware NSX® Metrics

Para mayor información, podemos consultar la documentación oficial NSX Application Platform Overview.

Despliegue de NAPP

Para quienes no tienen claro qué conforma un despliegue de NAPP (NSX Application Platform), podemos dejar una imagen que resume los componentes del despliegue. Donde el componente principal para soportar la solución de NAPP, es la solución de vSphere with Tanzu.

Pasted image 20241008201848.png

Sé que la imagen anterior puede causar terror. Sin embargo, el equipo de ingeniería de VMware By Broadcom ha desarrollado una herramienta llamada NAPPA (NSX Application Platform Automation Appliance) con el fin de facilitar la implementación de cada uno de los componentes que conforman toda la infraestructura de Kubernetes requerida para soportar la solución de NAPP (NSX Application Platform).

De esta manera NAPPA ejecuta flujos de manera automática para, configurar vSphere with Tanzu, que es una solución que nos permite la ejecución de clústeres de K8s directamente sobre el Hipervisor a través de la creación de vSphere Namespaces. De igual manera NAPPA, usando el Supervisor Clúster desplegado con vSphere with Tanzu, crea automáticamente un vSphere namespace, donde se crea un Tanzu Kubernetes Clúster, al cual llamaremos Guest Cluster de ahora en adelante, y es donde la solución de NSX Application Platform toma vida, así como también todos los pods asociados a los servicios de Metric, VMware NSX® Intelligence™, VMware NSX® Network Detection and Response™, VMware NSX® Malware Prevention y VMware NSX® Metrics.

Para no hacer más largo el cuento lo vamos a dejar hasta ahí.

El problema: Versión TKR fuera de soporte

Ahora bien, el problema que vamos a solucionar acá es cómo mantener este Guest Cluster después de haberlo implementado con el NAPPA. Debido a que en muchas ocasiones, dependiendo de la versión del NSX que teníamos al momento de desplegar el NAPP (NSX Application Platform), la versión de dicho cluster puede quedarse en una versión fuera de soporte que puede generar problemas a medida que vamos actualizando nuestro ambiente de vSphere y de NSX.

Para efectos de laboratorio, hemos desplegado la versión más reciente de NAPP 4.2.0 y curiosamente el guest cluster se ha implementado usando la versión de TKR 1.23.8+vmware.3-tkg.1, que a la fecha está fuera de soporte. Este comportamiento es un issue conocido, para la herramienta de NAPPA y para evitar este comportamiento te invito a leer el siguiente post Desplegar NAPP con version de TKR soportado

Pasted image 20241008204215.png

Análisis de Compatibilidad

De acuerdo con la matriz de interoperabilidad deberíamos cumplir con las siguientes versiones mínimas de TKR.

Pasted image 20241009201638.png
Pasted image 20241009201659.png


Como podemos apreciar en la matriz de interoperabilidad, las versiones de TKR por debajo de 1.26.5 usadas por el guest cluster de NAPP, están actualmente fuera de soporte e incluso algunas de ellas podrían no ser compatible con tu NSX Intelligence o con tu vCenter Server.

Nota: El procedimiento explicado a continuación debe realizarse cuando hagamos una actualización de NSX o vCenter Server ya sea como consecuencia de una actualización de VMware Cloud Foundation (VCF) o cuando actualizamos estas soluciones de manera independiente, con el fin de mantener el clúster de NAPP compatible y dentro del soporte de VMware by Broadcom.

¡Sin más preámbulo vamos al Lab!

Solución

Lo primero que vamos a hacer es seguir la documentación Update a TKG Cluster by Editing the TKR Version, pero no te preocupes acá vamos a explicarlo paso a paso.

Nota: Debemos tener presente que la versión de TKR solo se puede subir de manera gradual, n + 1, es decir que si tenemos la versión 1.23, el primer salto debe ser a la 1.24 y así sucesivamente hasta alcanzar la versión requerida.

  1. Iniciar sesión en el NAPPA vía SSH, con el usuario root ya que desde ahi podremos conectarnos al supervisor cluster sin necesidad de instalar ningún plugin en nuestra VM y vamos a ejecutar el siguiente comando.
    Pasted image 20241008205643.png

  2. Ejecutar el siguiente comando para iniciar conexión al Supervisor cluster. Sino sabes cuál es la IP del Supervisor Cluster solo ve al vCenter Server > Menu > Workload Management > Namespaces > Supervisor Cluster
    Pasted image 20241008205737.png
    kubectl vsphere login --insecure-skip-tls-verify --server [IP_SupervisorCluster] --vsphere-username administrator@vsphere.local)
    Pasted image 20241008210229.pngAhora vamos a elegir el contexto que tiene nuestro despliegue de napp, que debería ser napp-ns-default y para ello usamos el siguiente comando
    kubectl config use-context [context_name]
    Pasted image 20241008210416.png

  3. Vamos a validar las versiones compatibles de TKR disponibles en la Libreria de contenido unida a dicho namespace, con el siguiente comando
    kubectl get tkr
    Pasted image 20241008210538.png
    Acá podemos apreciar que el NAPPA ha publicado en la librería de contenido tres imágenes, entre ellas la imagen de 1.27.6+vmware.1-fips.1-tkg.1 que es superior y compatible. Pero en el momento del despliegue ha usado la 1.23.8+vmware.3-tkg.1, lo cual es una pena porque ahora nos toca subir el Guest Cluster hasta llegar a esa version o una superior compatible de acuerdo con la matriz de interoperabilidad.

    Nota: Durante el despliegue, NAPPA configura una librería de contenidos llamada NSX Content Library en el vCenter, con esas tres imágenes. Sin embargo, no podemos hacer el salto desde la v1.23.x hacia la v1.27.x como ya lo mencionamos antes, así que tendremos que cargar las imágenes a dicha librería.
    Pasted image 20241008210919.png
  4. Para descargar y subir a la librería de contenidos las imágenes que nos faltan debemos ir a la siguiente URL https://wp-content.vmware.com/v2/latest/lib.json o también podríamos crear una nueva Content Library Subsribed con la siguiente URL https://wp-content.vmware.com/v2/latest/lib.json y conectar el namespace con esa librería.

    En este caso vamos a usar la primera opción y nuestro primer salto será hacia la versión v1.24.x
    Pasted image 20241008211501.png
    En el repositorio vemos dos imágenes pero vamos a seleccionar la que se llama ob-22036247-tkgs-ova-photon-3-v1.24.11---vmware.1-fips.1-tkg.1 y que por supuesto sea compatible, de acuerdo con la matriz de interoperabilidad.Así que hacemos clic en ella y luego sobre photon-ova.ovf clic derecho para copiar el link

    Pasted image 20241008211758.png

  5. Vamos ahora a la librería de contenidos NSX Content Library > Actions > Import Library Item y seleccionamos la opción URL, donde vamos a pegar el link copiado anteriormente.
    Pasted image 20241008214718.png
    Nota: En el item name, recomiendo colocarle el mismo nombre que tiene en el portal de descarga para que sea fácil identificarla.

    Clic en IMPORTAR y esperamos que se descargue
    Pasted image 20241008214744.pngRepetir los pasos para las siguientes imágenes que seran los saltos graduales:

    ob-22757567-tkgs-ova-photon-3-v1.25.13---vmware.1-fips.1-tkg.1
    ob-23319040-tkgs-ova-photon-3-v1.26.12---vmware.2-fips.1-tkg.2
    ob-23049612-tkgs-ova-photon-3-v1.27.6---vmware.1-fips.1-tkg.1
    ob-24026550-tkgs-ova-photon-5-v1.28.7---vmware.1-fips.1-tkg.1

    La Content Library debería verse de la siguiente forma. Recordemos que las imágenes que hemos seleccionado han sido selecionadas teniendo en cuenta la matriz de interoperabilidad entre NSX intelligence y Tanzu Kubernetes Releases.
    Pasted image 20241008222258.pngAhora si lanzamos nuevamente el comando kubectl get tkr, las imágenes que hemos cargado deberían mostrarse con true en la columna READY y COMPATIBLE. OJO! No deberíamos aplicar ninguna imagen que no cumpla con estas condiciones.
    Pasted image 20241008222327.png

  6. Ahora lanzamos el siguiente comando para ver la siguiende versión disponible del cluster de kubernetes y el nombre del Guest Cluster que vamos a intervenir.
    kubectl get tanzukubernetescluster
    Pasted image 20241008222057.png

  7. Listamos los Tanzu Kubernetes releases
    kubectl get tanzukubernetesreleases
    Pasted image 20241008222410.png

  8. Ejecutamos el siguiente comando para editar el manifest de Guest Cluster
    kubectl edit tanzukubernetescluster/CLUSTER-NAME
    Pasted image 20241008222735.png
    Aqui vamos a editar unicamente las lineas de las referencias para el controlplane y nodePools que aparecen dentro del objeto topology
    Pasted image 20241008223241.png

  9. Verifique en la salida del comando kubectl indique que la edición del manifiesto se realizó correctamente
    Pasted image 20241008223302.png

  10. Verifique con el siguiente comando que el Guest Cluster se este actualizando
    kubectl get tanzukubernetescluster
    Pasted image 20241008223750.png
    Nota: En la salida del comando vemos que la columna READY dice False debemos esperar a que aparezca True. La paciencia es la clave, esto puede tomar hasta 30 min.

  11. Una vez actualizada debería verse de la siguiente forma
    Pasted image 20241008224344.png

  12. Repetimos los pasos 8 a 11 hasta llegar a la versión de destino. Por ejemplo nuestro siguiente salto sera ala version v1.25.13---vmware.1-fips.1-tkg.1 y asi susesicamente. Sin embargo, antes de hacerlo lee las siguientes notas importantes.

  13. Al finalizar deberíamos ver la versión de distribución de la siguiente manera
    Pasted image 20241009141240.png


Notas importantes

Nota 1: Podemos monitorear el proceso desde napp-ns-default > Monitor

Pasted image 20241008224450.png

O en napp-ns-default > Compute debemos esperar hasta que la columna Phase pase de Updating a Running. Sin embargo, cuando aparece Running no indica que ya ha terminado. Aún podemos ver eventos y tareas corriendo en el inventario.

Pasted image 20241008225555.png

Nota 2: Durante cada salto de actualización veremos como se crean nodos adicional mientras ocurre el proceso. La actualización comienza por los nodos del Control Plane y despues en los nodos Worker. Es importante que antes de iniciar con el siguiente salto, verifiquemos no se encuentren tareas en ejecución, que la cantidad de nodos en el inventarios sea la correcta, en mi caso del LAB debería tener únicamente un Control Plane node y un Worker Node. En el siguiente pantallazo vemos un nodo de más, es decir que aún no ha terminado.

Pasted image 20241008234330.png

Una vez terminan todas las actividades, vamos a ver que el numero de nodos para el Guest Cluster en el inventario es el correcto. Sin embargo, aún debemos esperar que la solucion del NAPP se estabilice.

Pasted image 20241009103042.png

Nota 3: Debemos esperar que la solución de NSX Application Platform se muestre estable desde la consola de NSX. Esto puede tardar algunos minutos.

Pasted image 20241009111506.png
Pasted image 20241009111527.png

Nota 4: Si utilizamos la opción de Troubleshooting del NAPPA (NSX Application Platform Automation Appliance), podemos ver el momento en el que todos los Pods estén arriba.

Pasted image 20241009111711.png
Pasted image 20241009111916.png

o podemos usar el comando napp-k get pods -A

Pasted image 20241010183303.png

Screenshots de referencia para los actualizaciones (saltos) adicionales.

Salto a v1.25.13---vmware.1-fips.1-tkg.1

Pasted image 20241008230058.png
Pasted image 20241008230130.png
Pasted image 20241008232632.png


Salto a v1.26.12---vmware.2-fips.1-tkg.2

Pasted image 20241008232740.png
Pasted image 20241008234210.png
Pasted image 20241009105148.png


Salto a v1.27.10---vmware.1-fips.1-tkg.1

Pasted image 20241009105012.png

Actualizar Kubernetes Tools

Una vez hemos terminado con las actualizaciones y nos encontremos ahora en una versión compatible de acuerdo con la matriz de interoperabilidad de NSX Intelligence. Es probable que vea la siguiente alerta en la interface. Si estas en una version superior a NSX 4.1.2.2 seguramente no te va a salir esta alerta.

Server version v1.27.10+vmware.1-fips.1 and client version v1.23.3 are incompatible. Please upload Kubernetes Tools to resolve.

Pasted image 20241009112714.png

Para solucionar dicha alerta solo sigue el siguiente KB NAPP pane in NSX UI shows message "Server version <version> and client version <version> are incompatible. Please upload Kubernetes Tools to resolve.

¡Y eso es todo amigos! Con este procedimiento vas a poder darle mantenimiento al cluster de Kubernetes (K8s) desplegado como parte de la solución NSX Application Platform (NAPP).

¡IMPORTANTE! He migrado blog del dominio nachoaprendevirtualizacion.com a nachoaprendeit.com. Si te ha servido este artículo deja tu buen Like y compártelo con tus colegas, estas aciones me ayudarán a optimizar los motores de búsqueda para llegar a más personas.

TODOS LOS NOMBRES DE VMS USADOS EN ESTE BLOG SON INVENTADOS Y OBEDECEN A UN AMBIENTE DE LABORATORIO PROPIO, UTILIZADO PARA FINES DE ESTUDIO.

Fix Unsupported TKR in NAPP Deployment

If you have deployed NSX Application Platform (NAPP) using the latest version of NAPPA (NSX Application Platform Automation Appliance) and upon completion of the deployment you notice that the Guest Cluster supporting the NAPP solution is on a TKR (Tanzu Kubernetes release) version of v1.23.8, this post is for you, and I will explain how to resolve it in under 3 minutes.

Pasted image 20241008204215.png

Well, if you’re here, it’s because you’ve already realized that even though you’re using the latest version of NAPPA, it is deploying the Guest Cluster in an unsupported version (v1.23.8).

Pasted image 20241009201638.png
Pasted image 20241009201659.png

The bad news is that it is a reported issue with the NAPPA tool (version 4.2), which, although it has three images of TKR incorporated and loads them into the content library, ends up choosing version v1.23.8 instead of v1.27.6, even though both were shown as COMPATIBLE.

Pasted image 20241008210538.png

Solutions

At this point, you have two options: update from TKR v.1.23.8 until you reach at least v1.26.5, although I would recommend going for v.1.27.6. I will be posting an article for that update soon, so don’t miss it!

The other option, which is smarter and requires less effort, is to remove the deployment using the CLEANUP function of NAPPA to redeploy it while keeping in mind some considerations that I will explain later.

If you decided to remove the deployment, go to NSX Application Platform Automation Appliance, proceed next to the wizard until you reach the end. This is where your deployment should have finished; start from the last stage of deployment > Deploy NAPP and click on CLEANUP.

Pasted image 20241010184546.png

Note: If you had already activated any NAPP service with NSX Intelligence, go to the NSX graphical interface and click on remove that service; otherwise, it will not let you delete the deployment. Once the service is removed, it should look like the following image.

Pasted image 20241010190039.png

After doing the same (CLEANUP) in the Deploy TKGs stage. This will remove the deployment of NAPP and vSphere With Tanzu from your environment to simply redeploy it.

WARNING! Do this only if you have deployed vSphere With Tanzu using the NAPPA and only for the purpose of the NAPP.

Pasted image 20241010184646.png

At this point, you have only made a couple of clicks to remove the deployment, which is why it is my preferred option.

Now you just need to update NSX to version 4.1.2.2 or higher and relaunch the NAPP. This update is very straightforward; moreover, it will help you to get rid of one or two vulnerabilities that you might have in the environment.

In my case, I upgraded from NSX version 4.1.2.1 to version 4.1.2.5.

Pasted image 20241010002049.png

Here you just need to restart the NAPPA assistant from the beginning; the good news is that all the data is already preloaded, you just have to re-enter a couple of passwords.

Pasted image 20241010092327.png
Pasted image 20241010190724.png

If all has gone well, you should now have the Guest Cluster deployed that supports the NSX Application Platform (NAPP) in the supported and compatible version (v1.27.6).

Pasted image 20241010092517.png
Pasted image 20241018195240.png

And that’s all, friends! With this, we confirm that when we have a version of NSX higher than 4.1.2.2, the guest cluster is deployed with version v1.27.6.

ALL VM NAMES USED IN THIS BLOG ARE FICTITIOUS AND RELATE TO A CUSTOM LAB ENVIRONMENT USED FOR STUDY PURPOSES.

IMPORTANT! I have migrated the blog from the domain nachoaprendevirtualizacion.com to nachoaprendeit.com. If you found this article helpful, please give it a Like and share it with your colleagues; these actions will help me optimize search engines to reach more people.

Solución a TKR incompatible después del despliegue de NSX Application Platform

Si estas desplegado NSX Application Platform (NAPP) utilizando la ultima versión de NAPPA (NSX Application Platform Automation Appliance) y al finalizar el despliegue vez que el Guest Cluster que soporta la solución de NAPP esta en una versión de TKR (Tanzu Kubernetes release) v1.23.8. Este post es para ti, y te explico en menos de 3 minutos como solucionarlo.

Pasted image 20241008204215.png

Pues bien, si estas acá es porque ya te diste cuenta que aunque estas usando la última versión del NAPPA, te esta desplegando el Guest Cluster en una versión fuera de soporte (v1.23.8).

Pasted image 20241009201638.png
Pasted image 20241009201659.png

La mala noticia es que es un issue reportado de la herramienta NAPPA (versión 4.2), que aunque tiene incorporadas tres imágenes de TKR y las carga en la librería de contenido, termina eligiendo la versión v1.23.8 y no la v1.27.6, aunque las dos se mostraban como COMPATIBLE.

Pasted image 20241008210538.png

Soluciones

En este punto tienes dos opciones, hacer actualizaciones desde la TKR v.1.23.8 hasta llegar mínimo a la v1.26.5 aunque yo recomendaría mejor la v.1.27.6. Estaré publicando un post para esa actualización. Así que, ¡No te lo pierdas!

O la otra opción, más inteligente y con menos esfuerzo, es eliminar el despliegue usando la función de CLEANUP del NAPPA para volverlo a lanzar teniendo algunas consideraciones que te explico más adelante.

Si decidiste eliminar el despliegue, ve a NSX Application Platform Automation Appliance, next a el wizard hasta llegar al final, aquí fue donde debió haber terminado tu despliegue, comienza por la última etapa del despliegue > Deploy NAPP y clic en CLEANUP

Pasted image 20241010184546.png

Nota: Si ya habías activado algún servicio del NAPP con NSX Intelligence, ve a la interface gráfica de NSX y haz clic en eliminar a ese servicio, de lo contrario no te va dejar eliminar el despliegue. Una vez eliminado el servicio, debe lucir como en la siguiente imagen.

Pasted image 20241010190039.png

Después hacer lo mismo (CLEANUP) en la etapa Deploy TKGs. Esto eliminará el despliegue de NAPP y vSphere With Tanzu de tu ambiente para simplemente volver a lanzarlo.

¡OJO! Hacer esto solo si has desplegado el vSphere With Tanzu usando el NAPPA y solo para el propósito del NAPP.

Pasted image 20241010184646.png

En este punto solo has hecho un par de clics para eliminar el despliegue, por eso es mi opción preferida.

Ahora solo tienes que hacer un update de NSX a la version 4.1.2.2 o superior y volver a lanzar el NAPP. Esta actualización es muy sencilla, además te va a ayudar a librarte de una que otra vulnerabilidad que puedas tener en el ambiente.

En mi caso pasé de la versión de NSX 4.1.2.1 a la version 4.1.2.5

Pasted image 20241010002049.png

Aquí ya solo debes volver a lanzar el asistente del NAPPA desde el principio, la buena noticia es que todos los datos ya aparece precargados, solo tienes que reingresar un par de passwords.

Pasted image 20241010092327.png
Pasted image 20241010190724.png

Si todo ha salido bien, deberías tener ahora desplegado el Guest Cluster que soporta la solución de NSX Application Platform (NAPP) en la versión soportada y compatible (v1.27.6).

Pasted image 20241010092517.png
Pasted image 20241018195240.png

¡Y eso es todo amigos! Con esto comprobamos que, cuando tenemos una versión den NSX superior a 4.1.2.2. El guest cluster se despliega con la versión v1.27.6.

TODOS LOS NOMBRES DE VMS USADOS EN ESTE BLOG SON INVENTADOS Y OBEDECEN A UN AMBIENTE DE LABORATORIO PROPIO, UTILIZADO PARA FINES DE ESTUDIO.

¡IMPORTANTE! He migrado blog del dominio nachoaprendevirtualizacion.com a nachoaprendeit.com. Si te ha servido este artículo deja tu buen Like y compártelo con tus colegas, estas aciones me ayudarán a optimizar los motores de búsqueda para llegar a más personas.